Chapter 1: Getting Started
This article will give you a step-by-step guide to create your own social advertising campaign. You will learn a step by step how to create your own wedding venue Facebook Ads.
As a quick note:
Johnson Jones Group (the agency providing this information) is a digital marketing agency that focuses specifically on Wedding Venue Marketing.
I will show you the best way our team sets up campaigns for wedding venues.
There are many options/settings in Meta’s advertising platform but this will be specific to wedding venues.
Each venue will also need some customizations for campaigns..
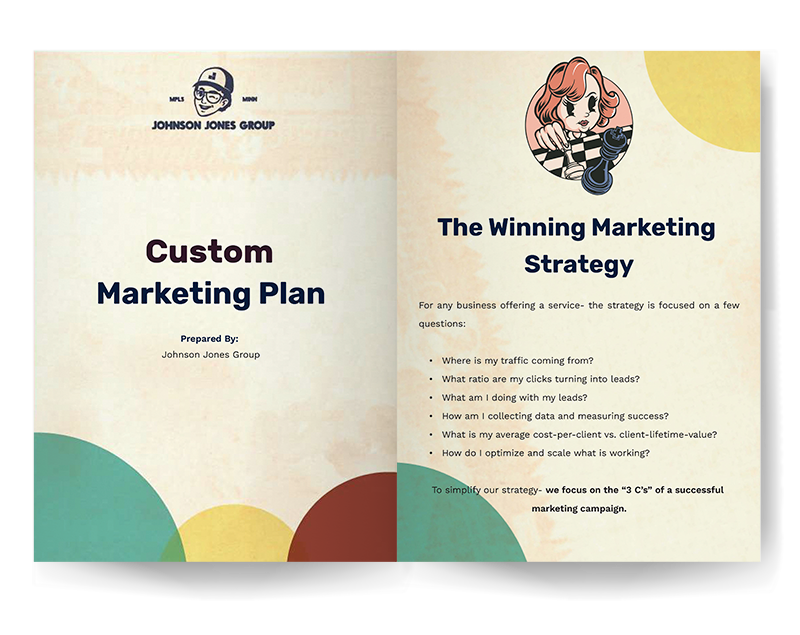
Find Out How We Can Help Grow Your Business
Let’s discuss your marketing needs, and we’ll help you put together a digital marketing strategy that will generate more leads and save you time.
So if you would like a free consultation for your venue specifically please feel free to reach out to us.

If you want to give it a shot DIY- then this article should help.
First, let’s start by accessing your Meta Ads Manager
Head over to: https://business.facebook.com/adsmanager/
From your home page you should see something that looks like this..
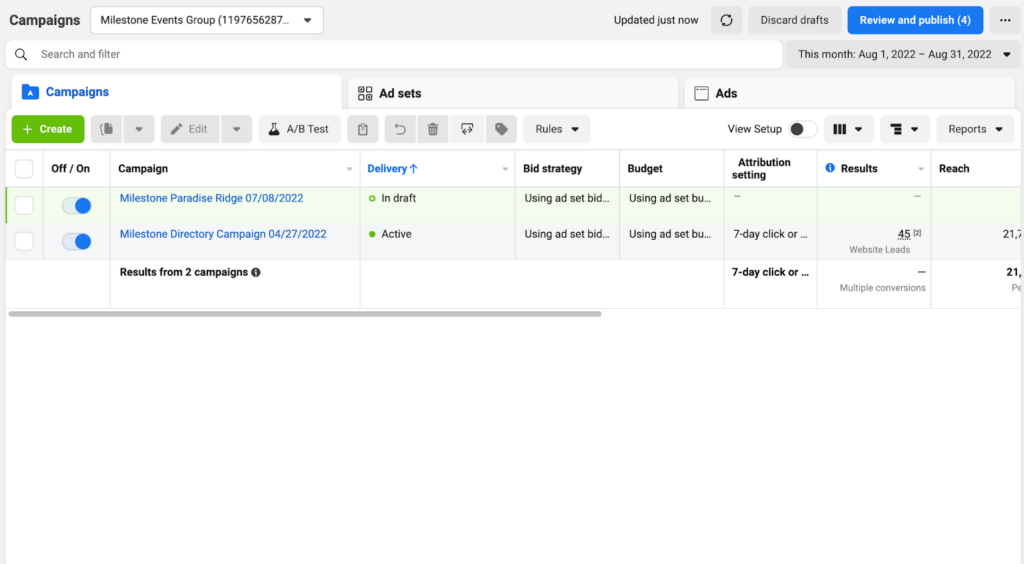
Meta Business Suite can be a little confusing because it has an “Ads Manager” and an “Ads Center.”
Ads center is typically accessed through your Meta Business Suite and looks like this…
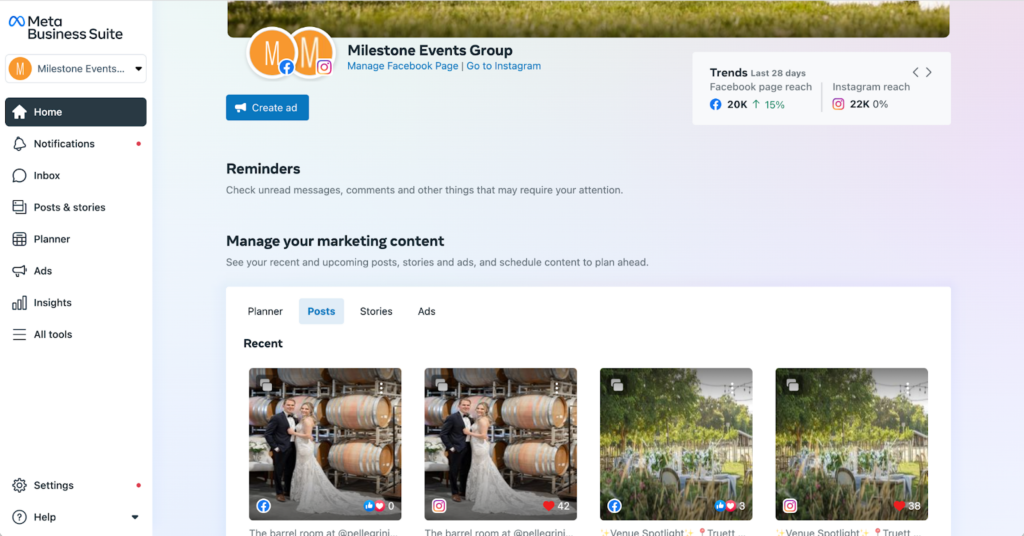
But for this guide- I prefer to use the Ads Manager provided in the link above.
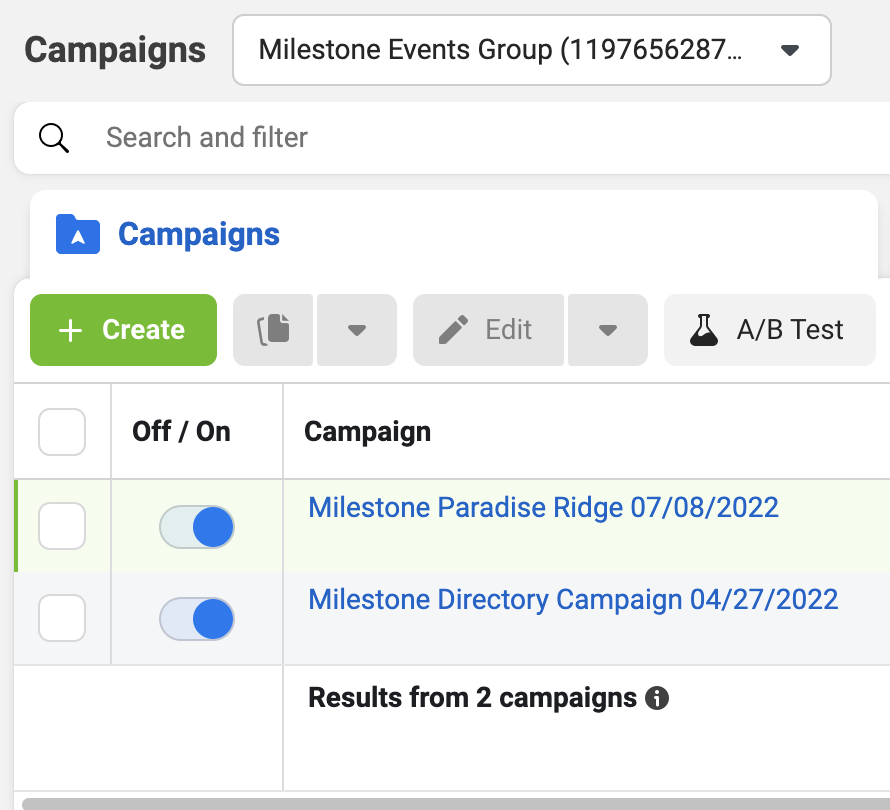
Now click the green “Create” button on the top left of your screen.
You should see a pop-up that asks you to select your campaign objective.
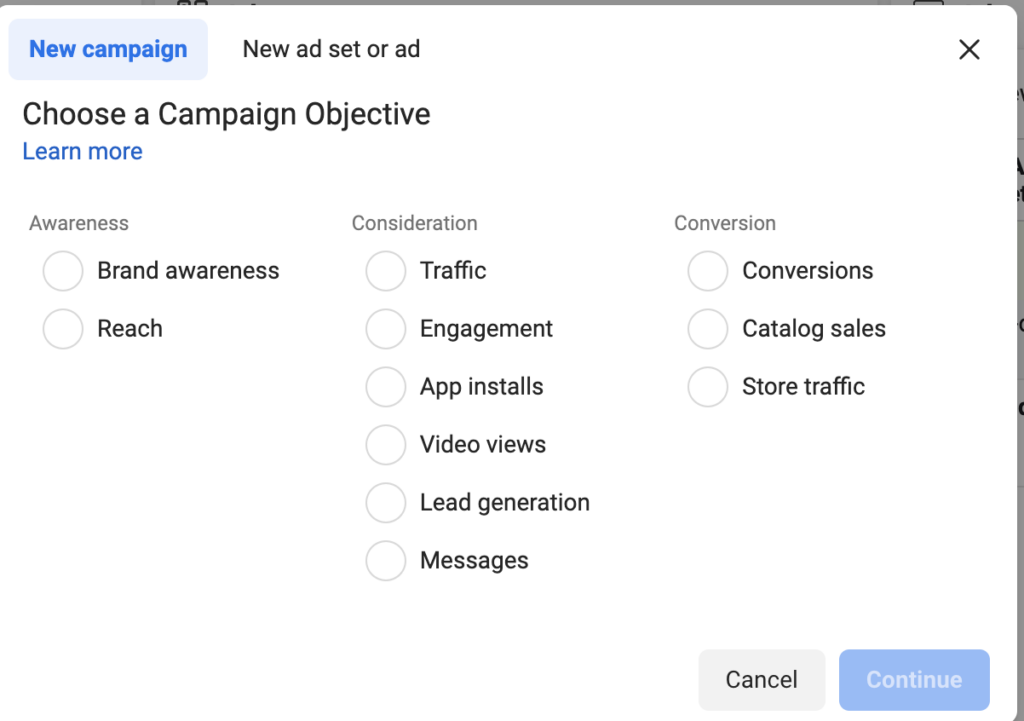
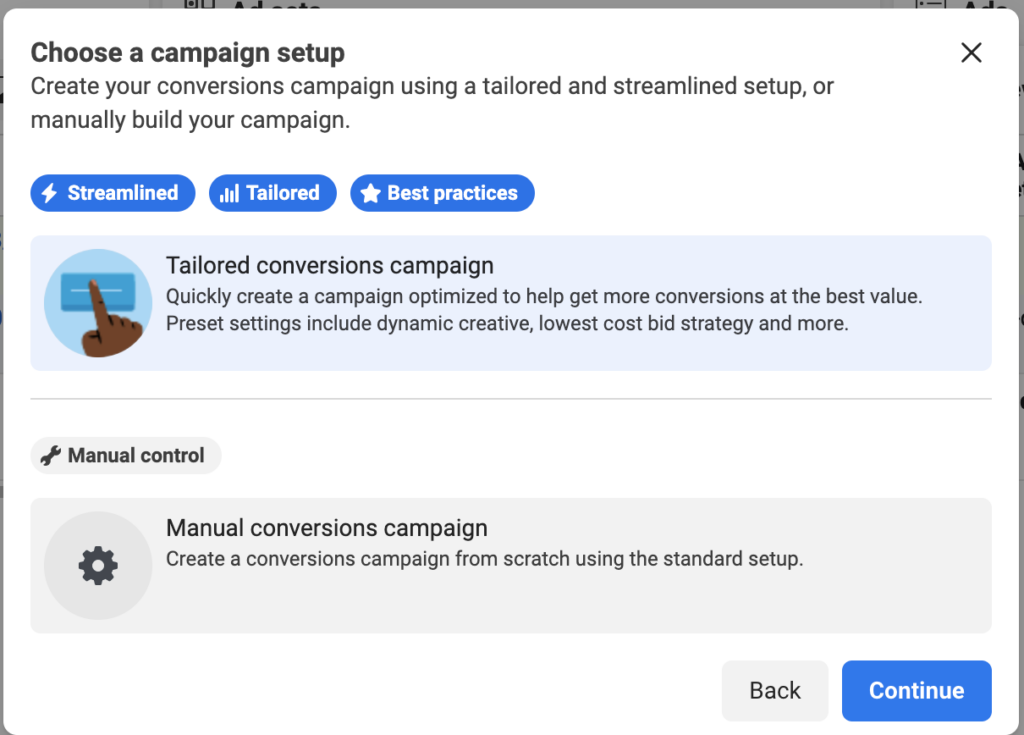
For your campaign objective, go ahead and select “Conversions” and hit Continue.
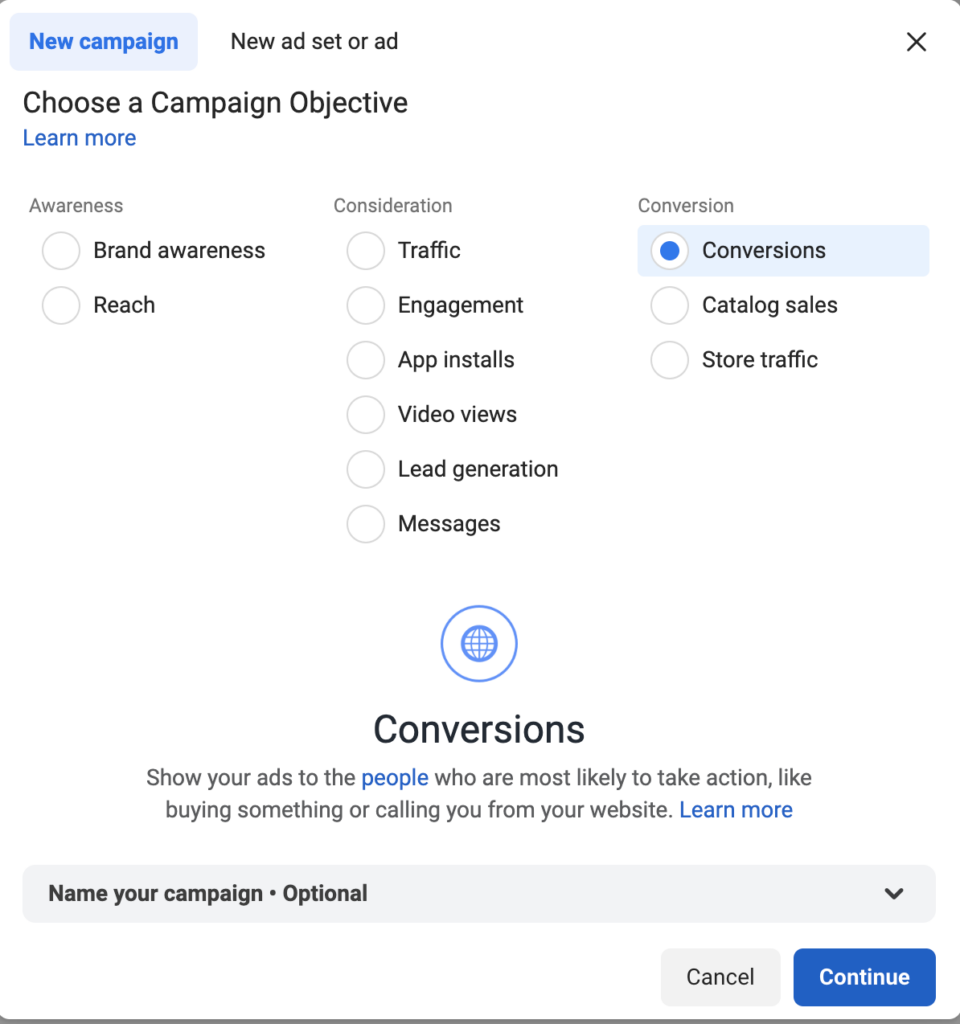
Then click on Manual Conversions Campaign and click Continue
Chapter 2: Setting Up Your Campaign
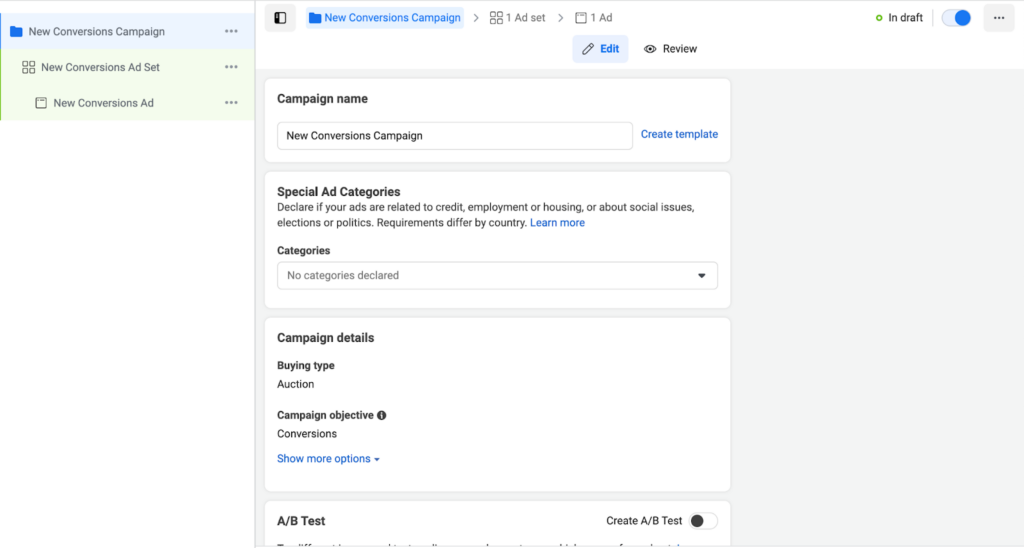
Once you have started your new campaign- you should land on a page that looks like this.
Let’s start with the basics and name your campaign.
In the “Special Ads” categories just leave that blank.
Bid type will stay Auction.
Campaign Objective will stay Conversions.
For simplicity, we will leave A/B test and Advantage Campaign Budget off.
Hit next and we’ll keep it moving.
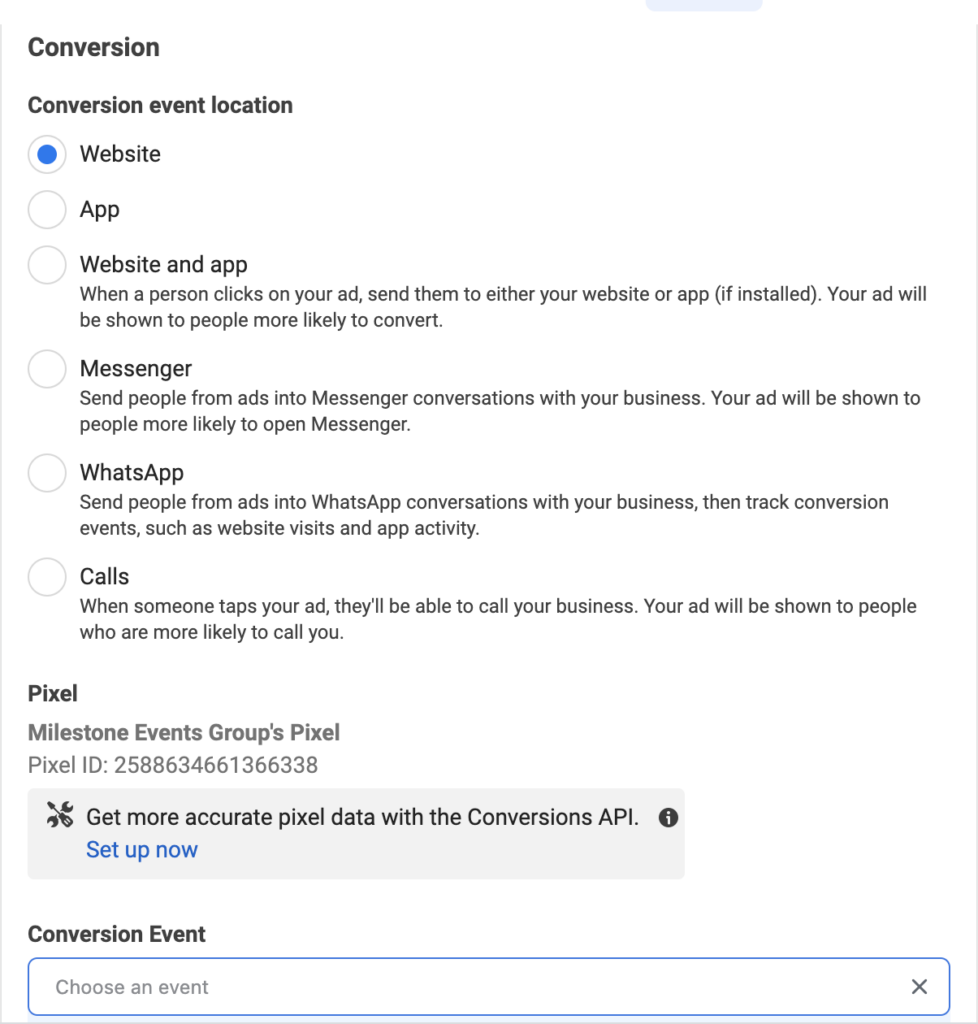
You will see a section like this for setting up conversion tracking.
This part will be the most technical part of this article so I will save it for the end.
However, I cannot stress enough how important this will be to measuring the success of your Facebook and Instagram Ads Campaigns.
I would briefly like to touch on a marketing fundamental quick that will make your campaign generate the highest amount of bookings (tested and confirmed)
Chapter 3: Before Continuing Your Campaign Setup
Now that we have set up the shell of our campaign- we want to set up tracking so we can accurately measure the results.
Before the step-by-step of conversion tracking I want to get into a Wedding Venue marketing fundamental strategy.
Specifically, the question we want to answer is:
“What do you want brides to do when they actually get to your website”
**This is the most important part of this article, and will be your most impactful change you can make to your marketing.**
For your conversion action you want to reduce friction and lower the barrier to entry.
Why?
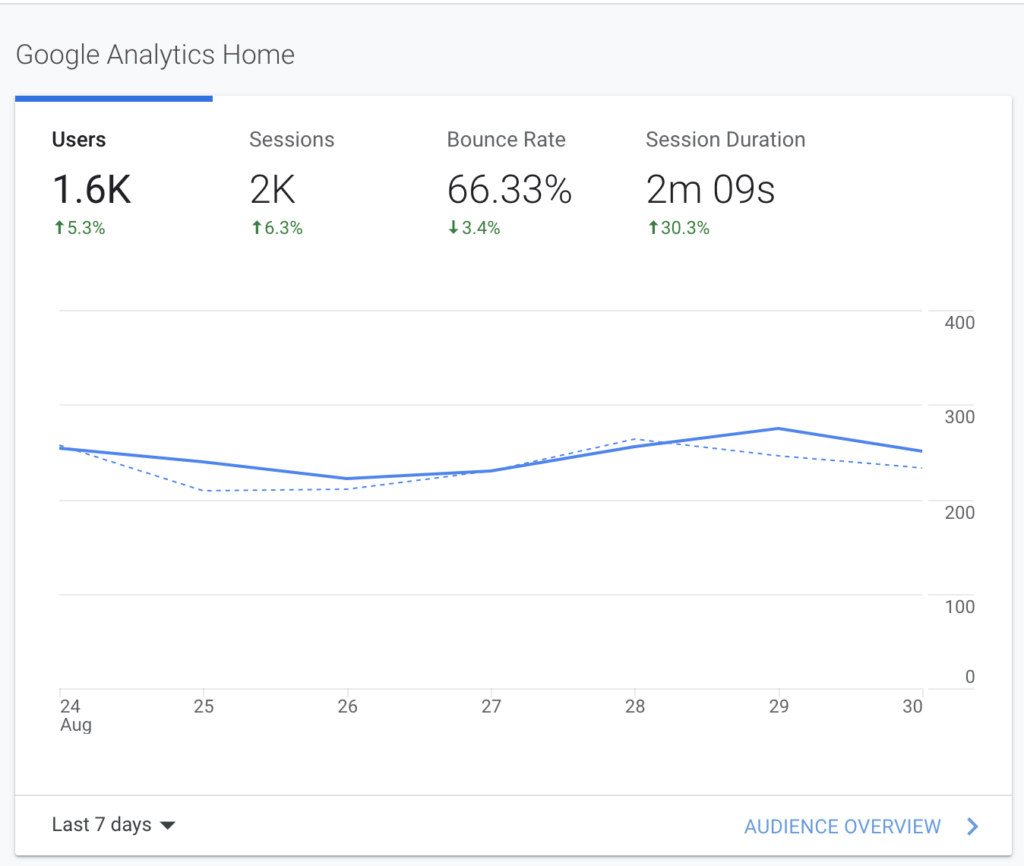
Because based on our average dwell time metrics- a user who clicks on your ad will give you UP TO 2 MINUTES of their attention.
I see countless venues that try to direct brides to a “Contact Us” page.
Or worse- they have a “request proposal” as their main Call-To-Action.
The Solution?
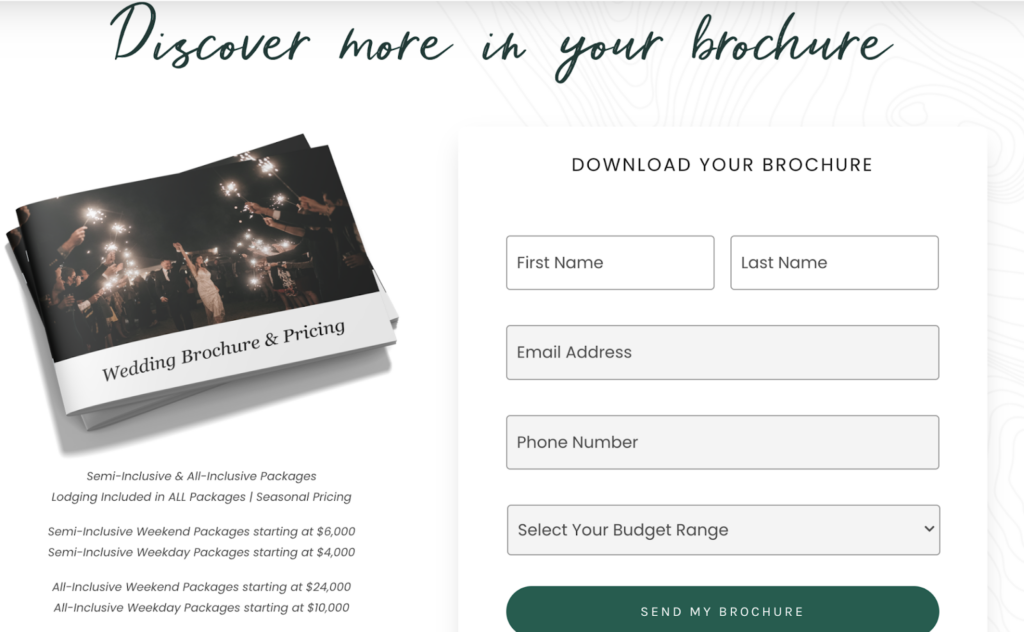
A Brochure…
So simple, yet so effective.
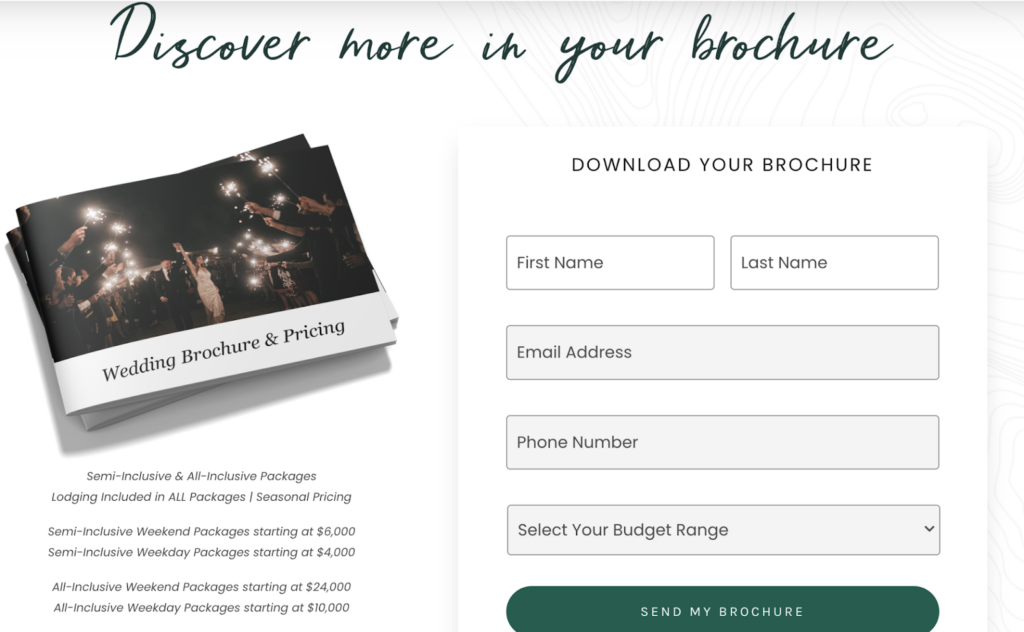
When advertising- once you realize that you have short attention spans, you can pivot properly.
An informational brochure allows you to condense the long blocks of text you have on your website.
You can focus on imagery and aesthetics (because this industry IS imagery and aesthetics).
And if a bride wants more information- they will engage in a micro transaction:
“All of our information in exchange for your contact information”
And just like that… You’ve turned clicks/analytics into real people that you can contact.
Chapter 4: Finishing Your Campaign Setup
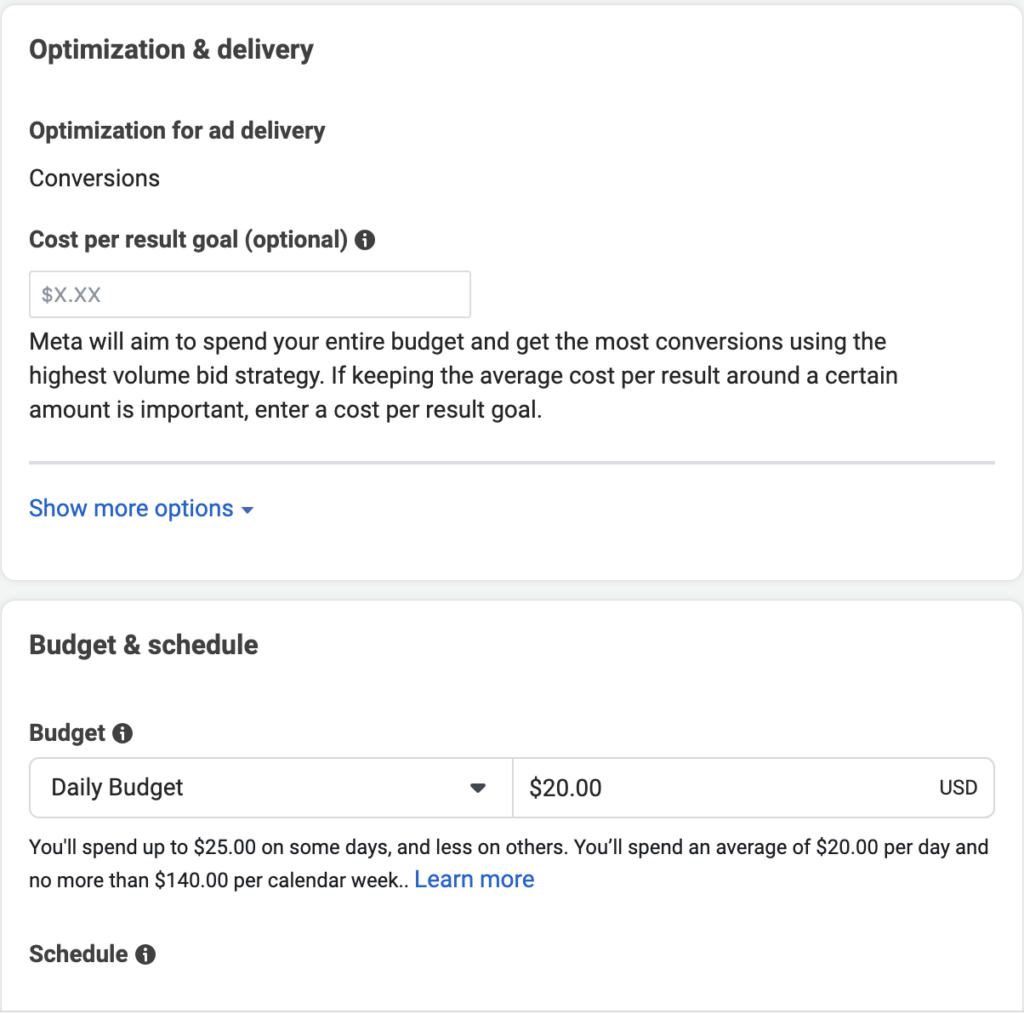
The next section will show your ideal “Cost Per Goal”
In the last section we covered what Johnson Jones Group uses as a conversion goal (brochure downloads).
I will typically set this for $15 and we will often times fall below that number.
Usually we see brochure downloads cost anywhere from $9-$13 on average- depending on the market your venue is in.
The daily budget section is really up to you- but I’m happy to give the short-and-sweet version of my recommendations for marketing budget.
- Take 7% of your Venue’s Gross Annual Revenue
- Cut that 7% in half. 50% for marketing maintenance. 50% for Ads
- Subtract your directory fees (weddingwire/The Knot) from your Ads Budget
- Put 65% of your remaining advertising budget into Google Ads
- Put the remaining 35% into Instagram/Facebook.
**If you are interested in a FREE custom marketing plan for your wedding venue please reach out to us at johnsonjonesgroup.com**
After you have your budget in- it’s time to get into Audiences.
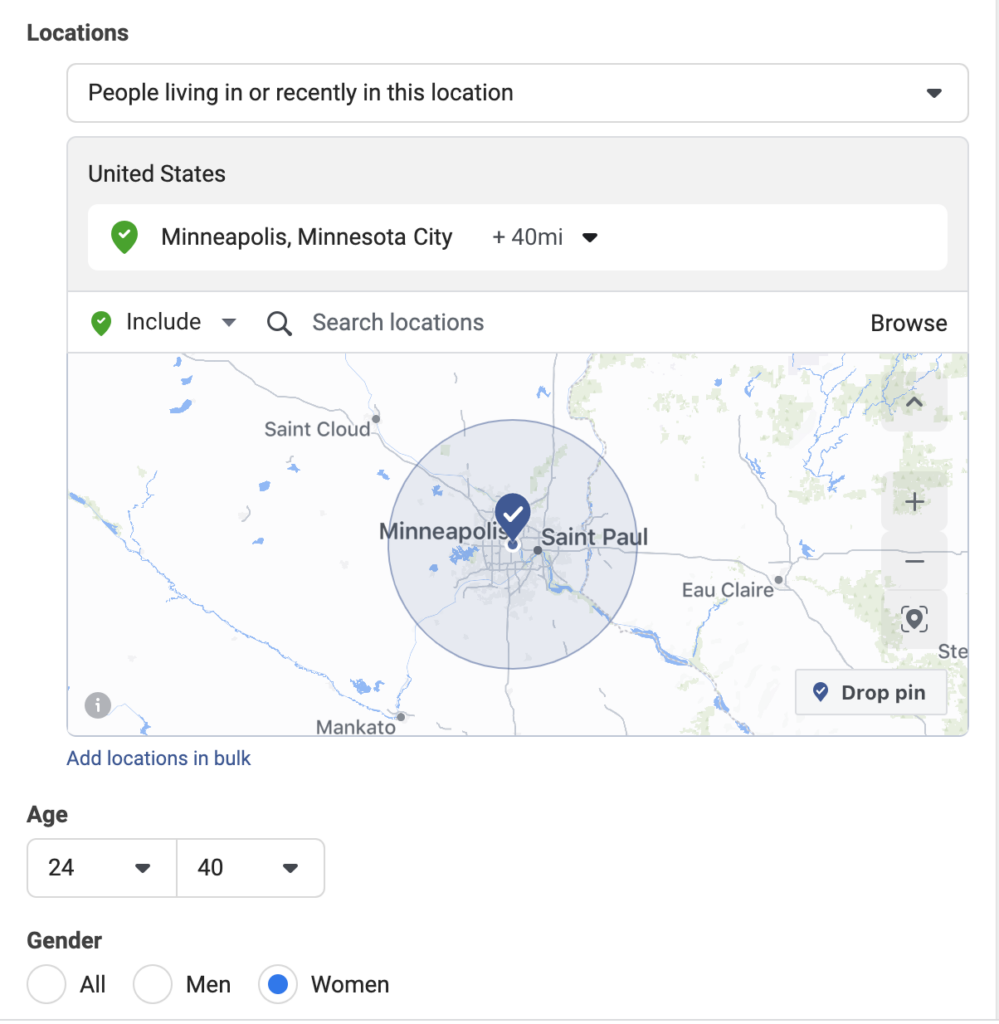
The typical targeting that I will do for wedding venues is:
Location: 30-60 Mile Radius around the venue (depending on your market)
Age: 24-40 is typically my best performing age range.
Gender: Women
Detailed Targeting:
- Newly-engaged (6 months)
- Newly-engaged (3 months)
- Household income: top 10% of ZIP codes (US),
- Household income: top 10%-25% of ZIP codes (US)
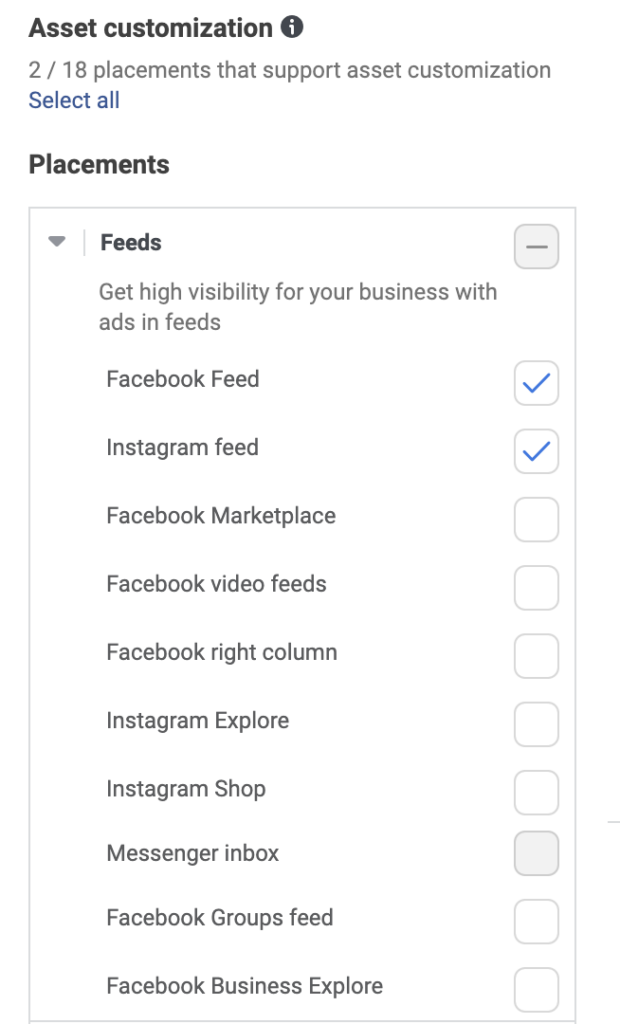
Finally, we will need to select the placements for your ads.
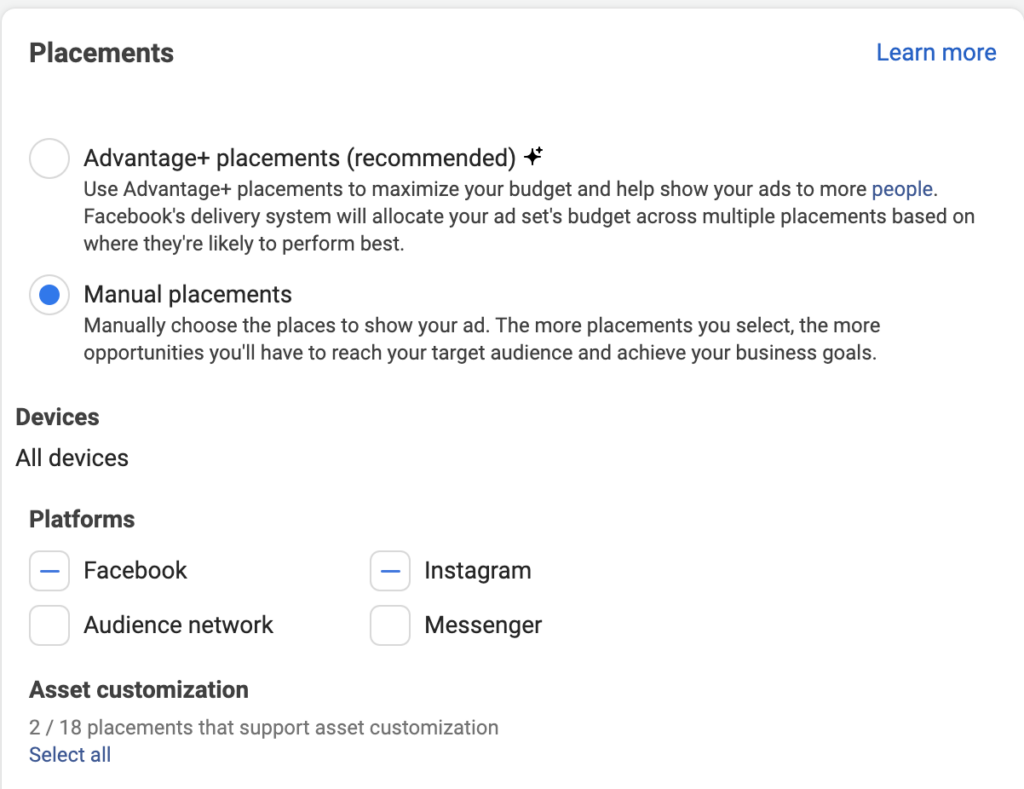
Start by selecting manual placements.
You will want to have full control of where your ads are showing.
Select only Facebook and Instagram from the options.
Then, select ONLY feeds.
This is a little insider trick but stories are more expensive placements so you’ll burn through your budget faster.
The other placements just aren’t a great place to capture your audience either.
Now that we have this complete, hit next and we will get into the ad creative.
Chapter 5: Setting Up Your Ads
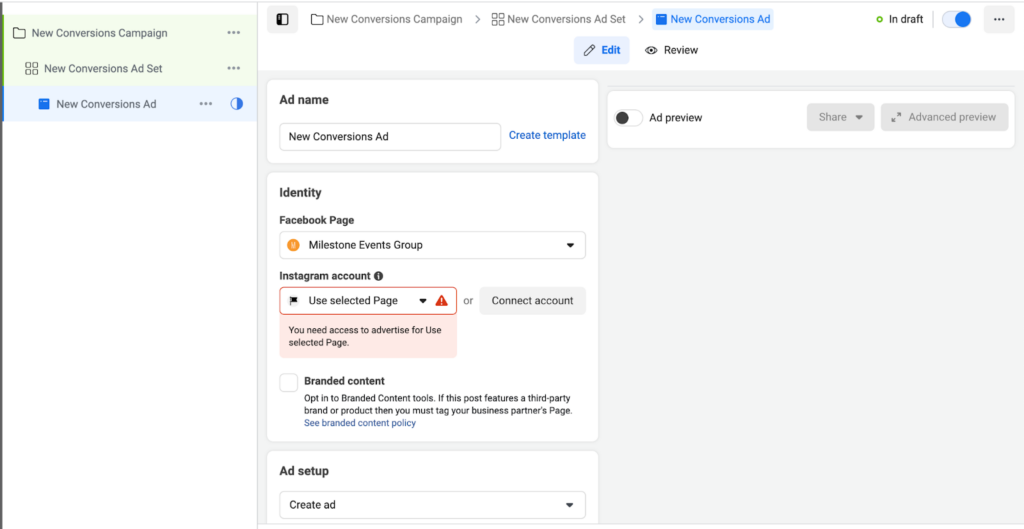
Now you should be on this page and ready to create your advertisement.
First, select a name for your advertisement.
Next, get your Facebook page and Instagram account connected to your advertisement.
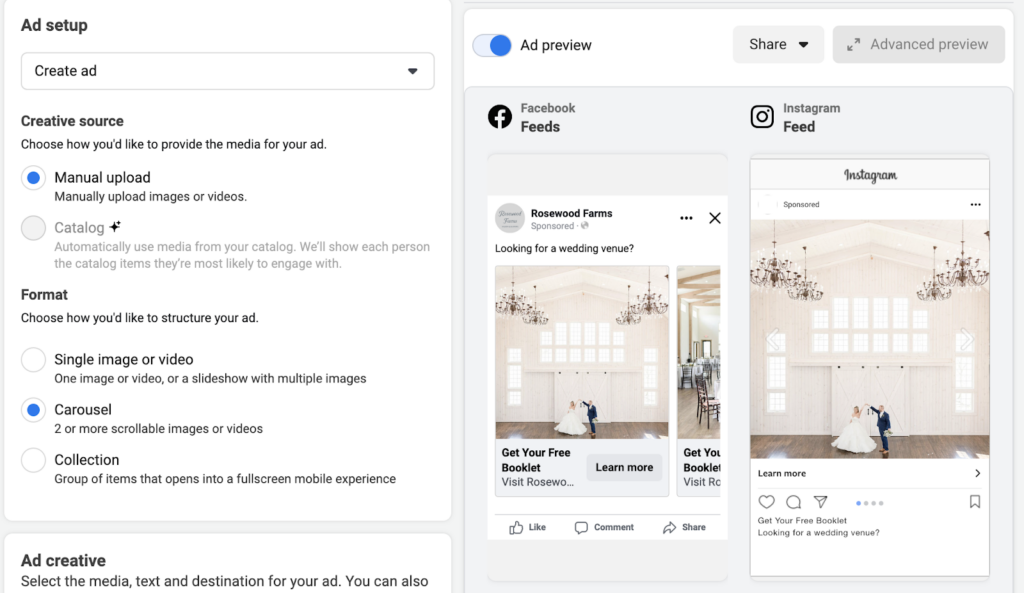
For your Ad Setup- select “Manual Upload”
I will typically do either a single image/video or a carousel.
Lately I’ve been featuring more carousel images so I can feature interior and exterior photos of the venue.
It’s also a great opportunity to feature multiple spaces for you bigger venues out there (looking at you wedding barns).
It’s very simple to upload you photos but I do have one suggestion:
Try to put your logo into your first image.
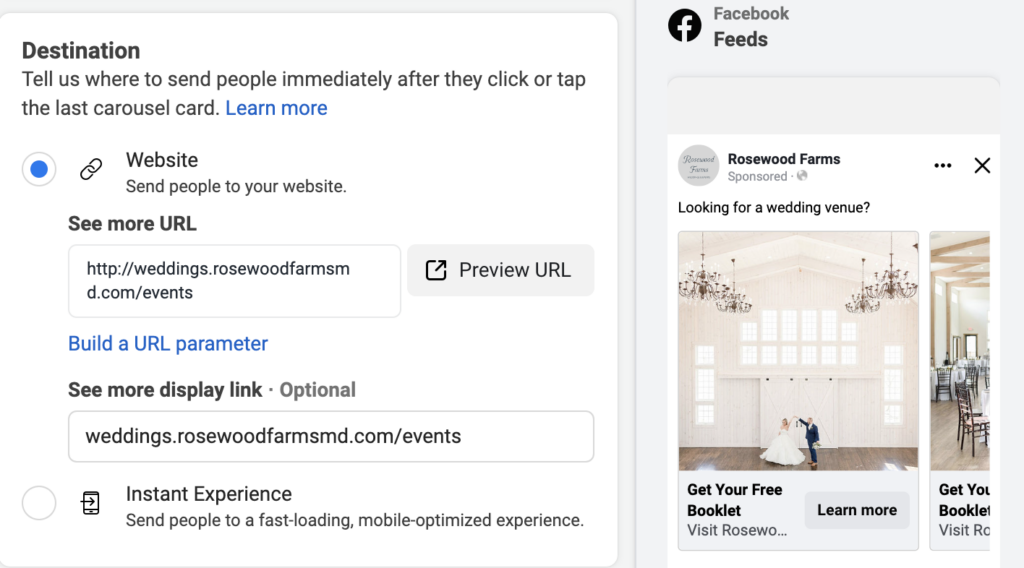
As you see above, I am currently working on this account. The photo I selected has a large amount of open space above the couple.
This is a great photo to fit the venue’s logo into the photo.
Once you’ve uploaded your photo it’s time to get into the final meat and potatoes.
-Landing Pages
-Thank You Pages
-Conversion Tracking
Chapter 6: Landing Pages & Thank You Pages
If you remember earlier in this post, we briefly touched on landing pages.
One of the biggest mistakes venues consistently make is sending traffic to the homepage of their website.
When you begin advertising it is important to mention again that you only have 2 minutes of attention from the bride before they leave the website.
That is what a landing page is for.
A landing page is essentially all your information condensed into a single page on your website.
The purpose is to get to the point quickly and try to get a bride to convert on the page before leaving.
For this reason we try to focus on a media heavy user experience on the landing page (expanded galleries, videos, virtual tours)
And we keep any written content easily digestible.
That means no big blocks of text.
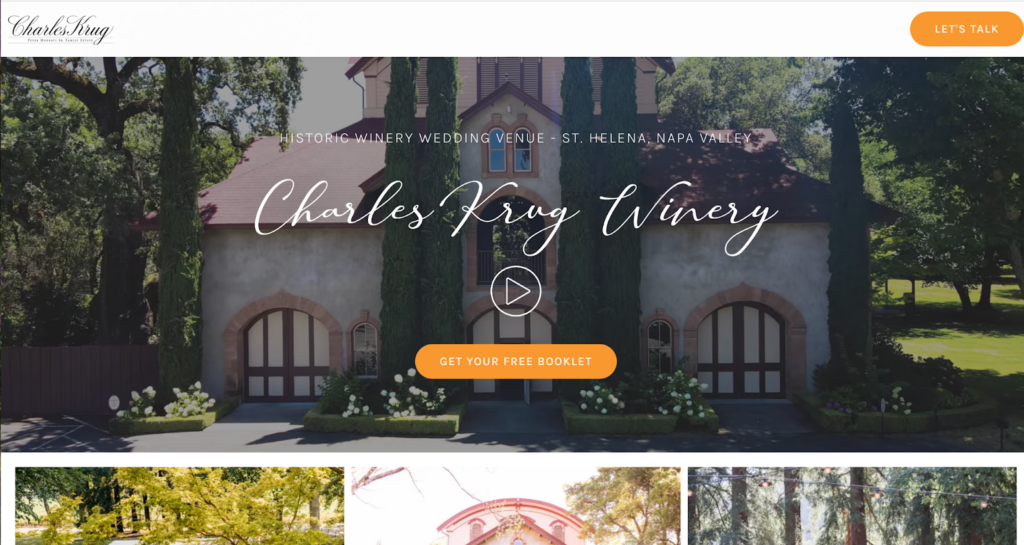
Here is an example of one of our venue landing pages: https://charleskrugweddings.com/
Notice we put the call-to-action (brochure download) at the top and bottom of the page.
I suggest before setting your ads live, you create a custom landing page for your campaign.
Now for Thank You Pages.
This is a VERY IMPORTANT step before we can finish your ads account.
In the next section we will go back to the conversion tracking part of your campaign to set up results measurement parameters for your account.
The Thank You Page is the bread and butter for this to work.
So what is a Thank You Page?
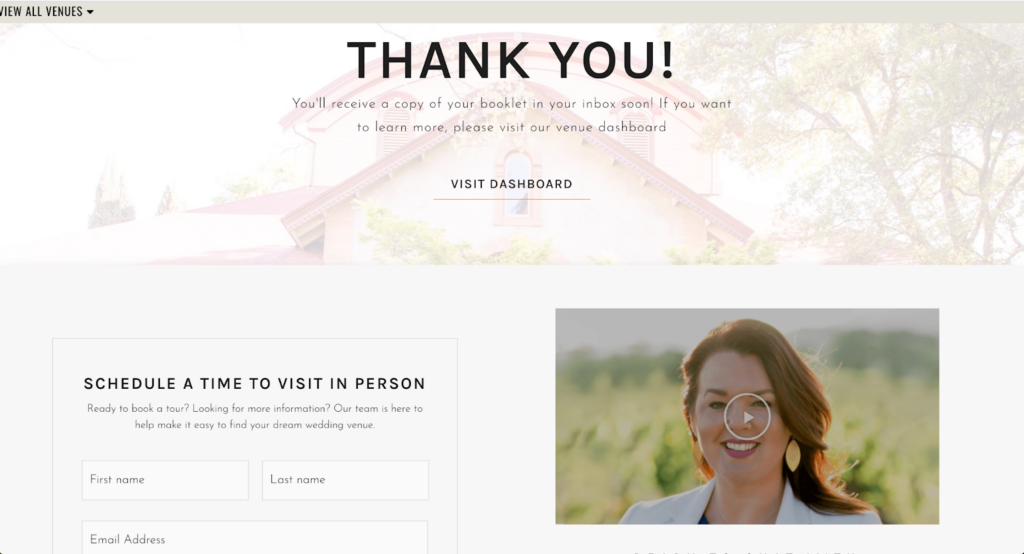
It’s actually very simple.
When a bride fills out the form to get a brochure- you want your website to then direct them to a specific page.
This specific page of your website can ONLY be accessed by a user IF they fill out the form.
For tracking purposes we can look at how many times this page was loaded and it will easily tell us how many brochures were downloaded.
For our Thank You Pages we add in a few things that will be useful resources to brides.
First we typically try to move them to the next step of the funnel- Scheduling A Tour.
We also include a video when possible so that brides get a chance to build rapport with the venue coordinator.
Finally, we offer an education dashboard (new to this year for Johnson Jones Group).
This dashboard gives brides the ability to get even more information to educate themselves further on what goes into shopping for a wedding venue.
Remember, they are most likely first-timers to this wedding thing.
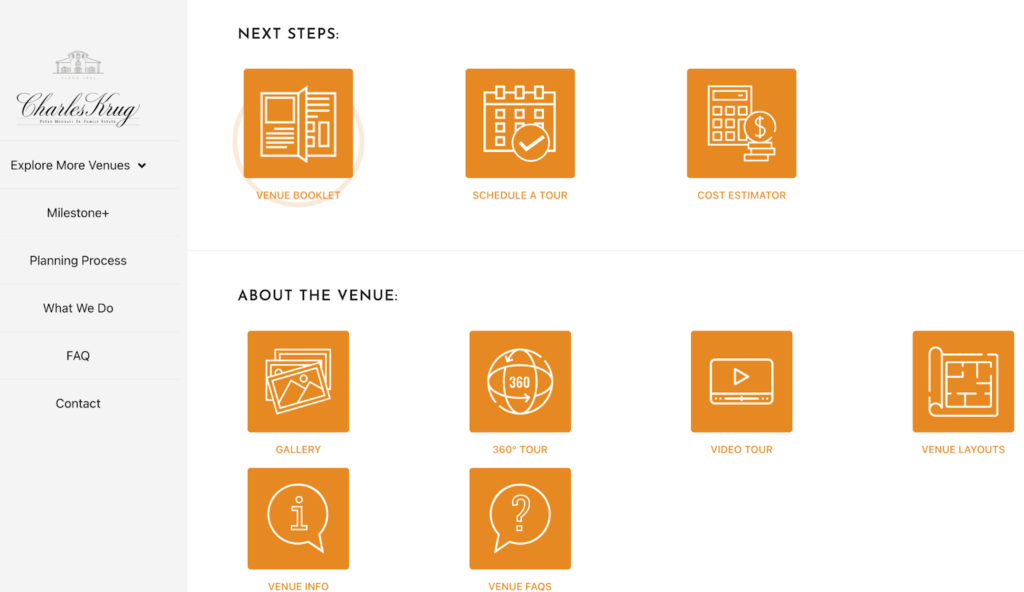
Feel free to check out our dashboard here: https://milestoneeventsgroup.com/dashboard/charles-krug-winery/
And of course, feel free to contact us if you are interested in one of your own:
Now that you’ve got a landing page and thank you page, let’s set up conversion tracking.
Chapter 7: Setting Up Conversion Tracking
Now that we have set up the shell of our campaign- we want to set up tracking so we can accurately measure the results.
Before the step-by-step of conversion tracking I want to get into a Wedding Venue marketing fundamental strategy.
Specifically, the question we want to answer is:
“What do you want brides to do when they actually get to your website”
**This is the most important part of this article, and will be your most impactful change you can make to your marketing.**
For your conversion action you want to reduce friction and lower the barrier to entry.
Why?
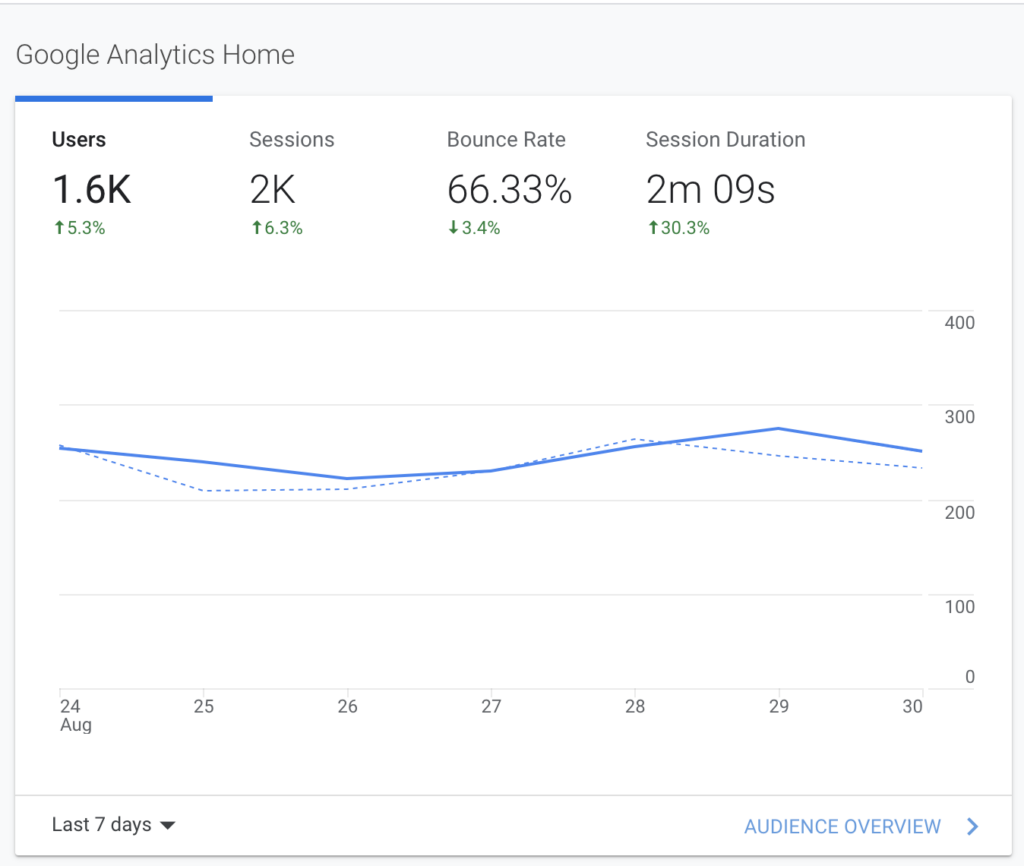
Because based on our average dwell time metrics- a user who clicks on your ad will give you UP TO 2 MINUTES of their attention.
I see countless venues that try to direct brides to a “Contact Us” page.
Or worse- they have a “request proposal” as their main Call-To-Action.
The Solution?
A Brochure…
So simple, yet so effective.
When advertising- once you realize that you have short attention spans, you can pivot properly.
An informational brochure allows you to condense the long blocks of text you have on your website.
You can focus on imagery and aesthetics (because this industry IS imagery and aesthetics).
And if a bride wants more information- they will engage in a micro transaction:
“All of our information in exchange for your contact information”
And just like that… You’ve turned clicks/analytics into real people that you can contact.
Chapter 8: Creating Your Facebook Pixel
To track how many brochure downloads we receive from our ads campaign we will need to set up our conversion tracking.
To do this we need to start by getting a facebook tracking pixel onto your website.
Start by opening a new tab and visiting: https://business.facebook.com/adsmanager
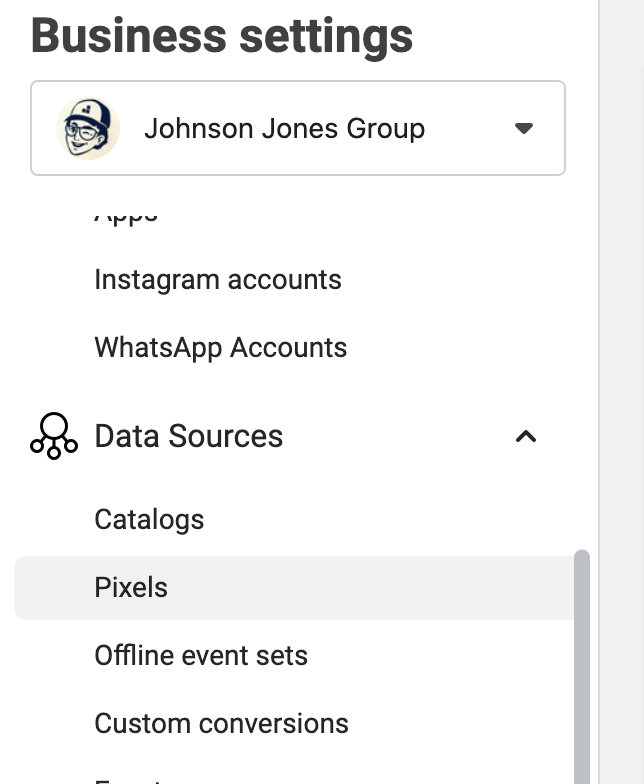
In the bottom left corner of your screen click “business settings” (the gear icon).
Next click the “data sources” drop down in the left side menu.
And select “Pixels”
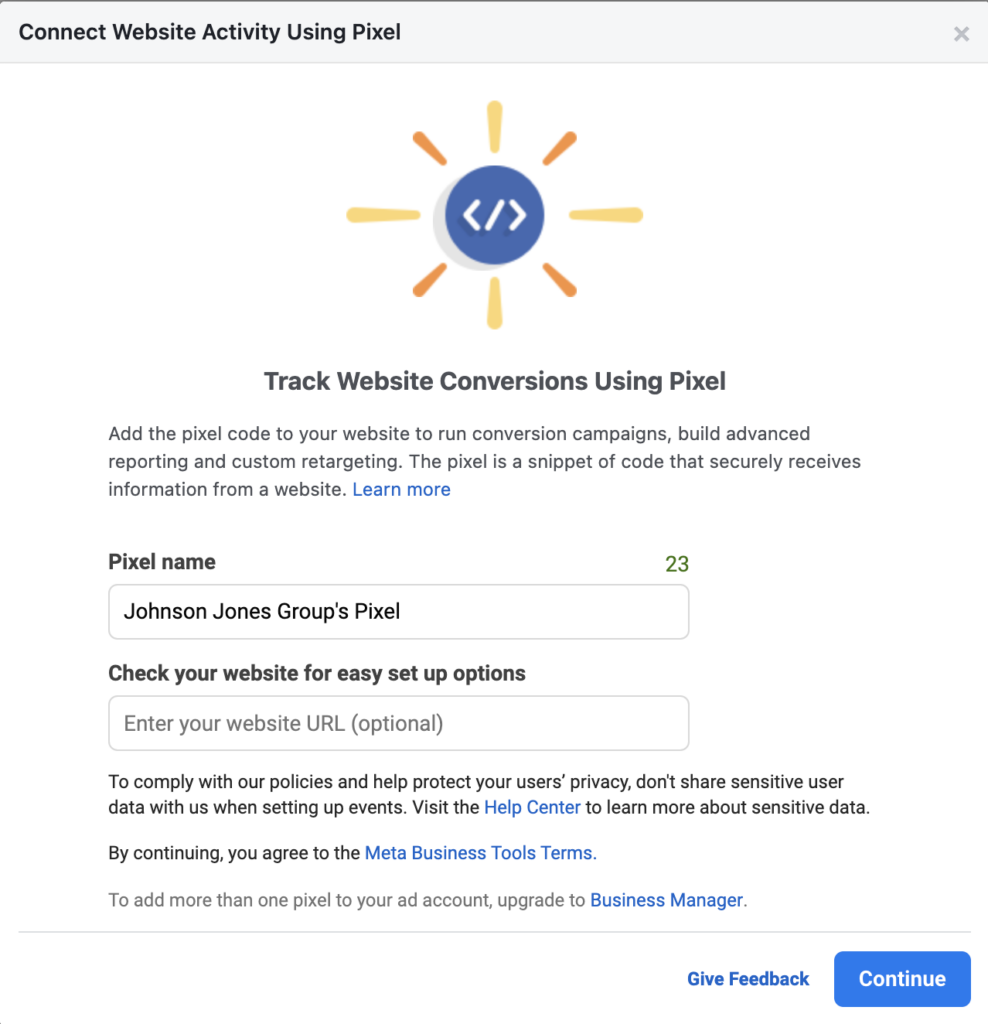
Then simply give your pixel a name and click continue:
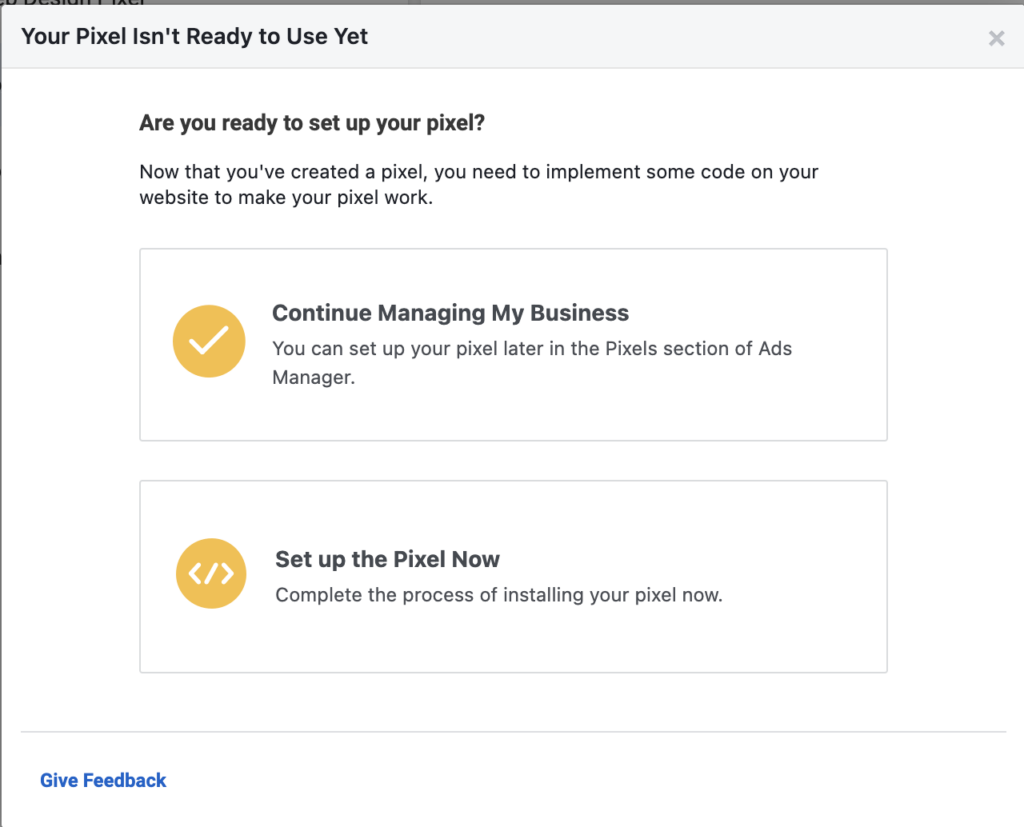
Before setting up your pixel we want to attach this pixel to your account, so just close the pop-up below for now.
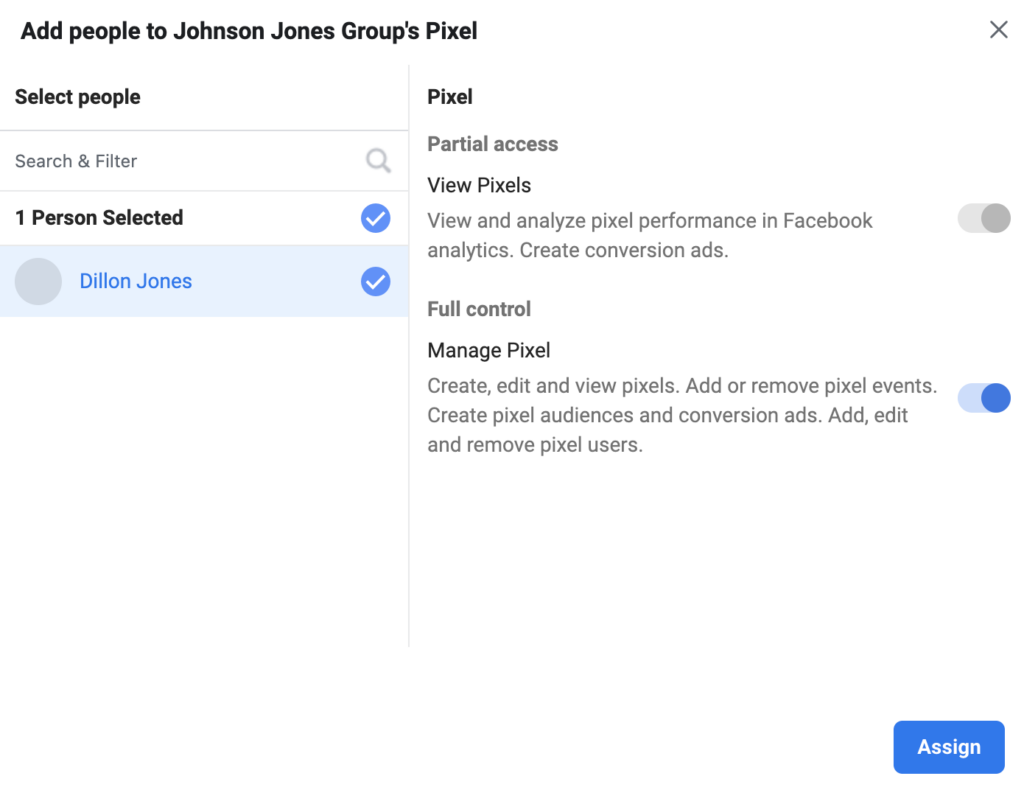
After closing out this out click on “Add People” and select yourself.
Also, give yourself full control of this pixel. Click Assign.
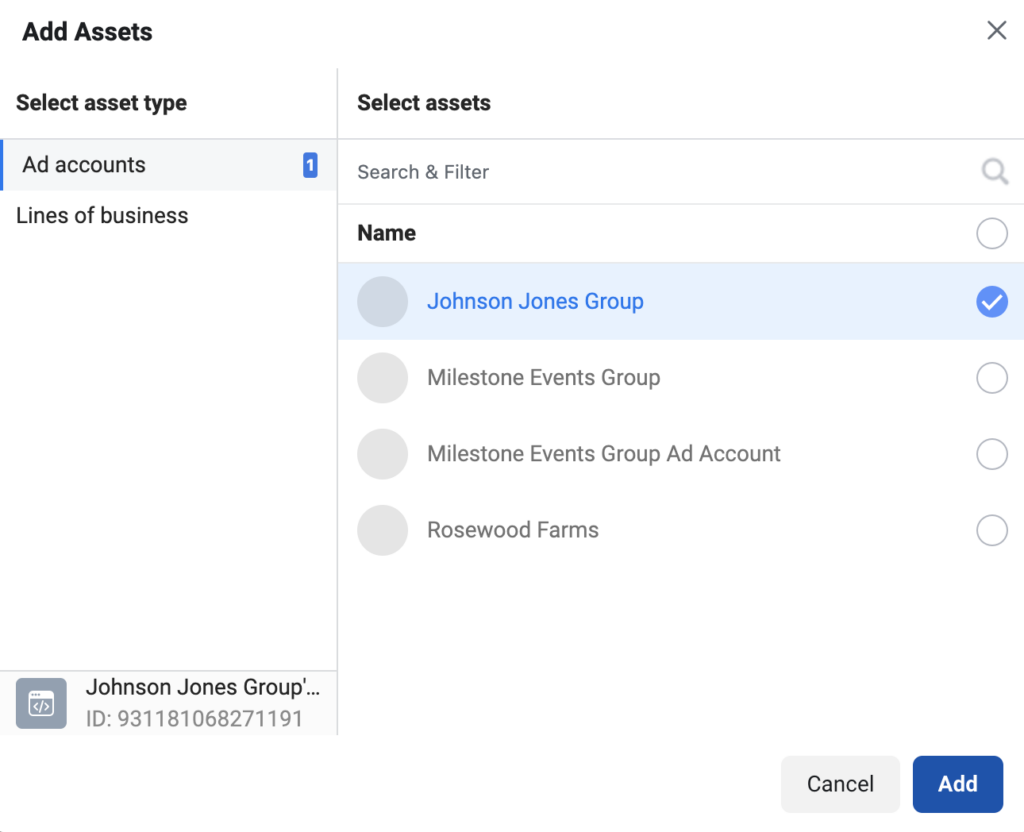
Then click “Add Assets” and attach the pixel to your account. Then click Add.
Now you have successfully created a pixel!
The next step is to add this pixel to your website.
Chapter 9: Installing Your Facebook Pixel
From the same page you are at after clicking “Add” (from step above):
Find and click the “All Tools” menu and then click on “Events Manager”
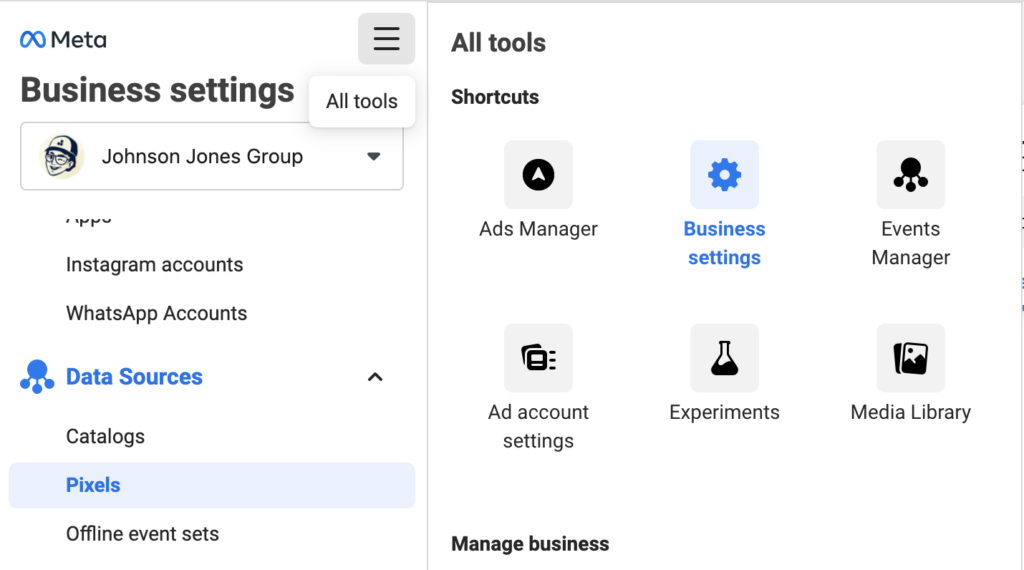
Once in Events Manager, click on Data Sources on the left side.
Find your pixel in the list and select it.
Then click on “Continue Pixel Setup”
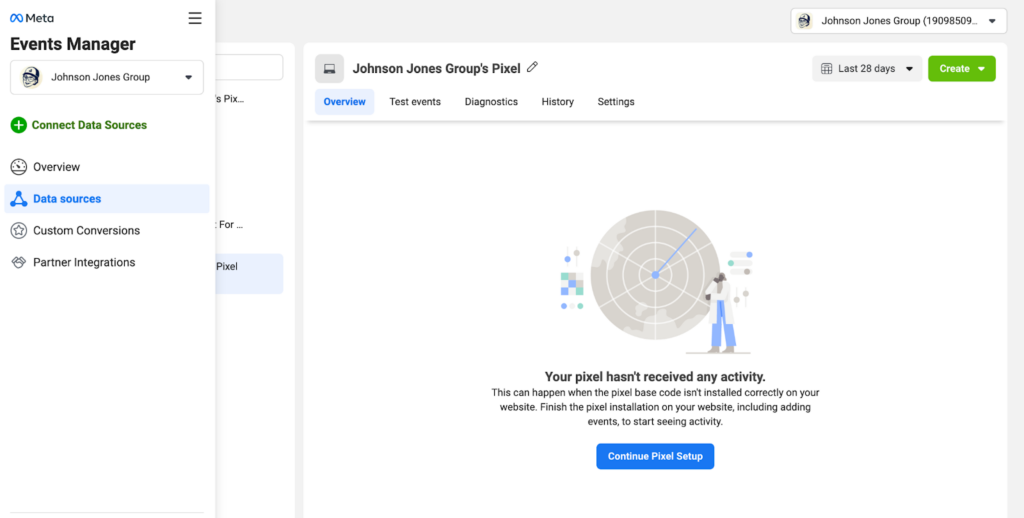
Now select the Meta Pixel option and click Connect.
Then click install code manually.
The next part involves working within your site.
If you need help with this step feel free to reach out to us at johnsonjonesgroup.com and we would be happy to assist you.
First you will need to copy the code and paste it into the header of your website.
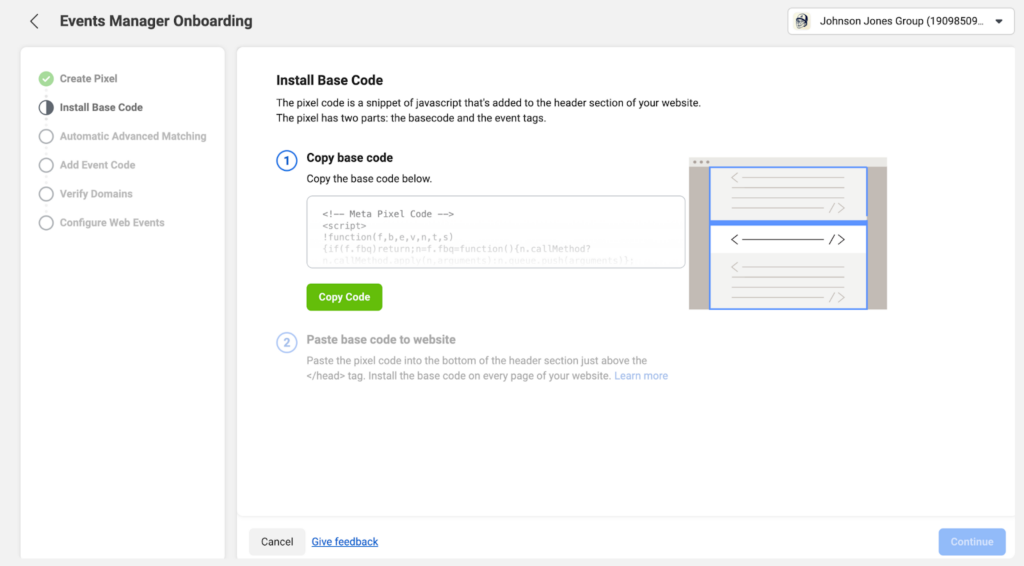
This will need to be pasted on every page you intend to track.
If we are using a brochure as our main call-to-action, we will want to redirect the user to a Thank You page after they fill out the form.
This will be a unique url like weddingvenue.com/brochure-download-thank-you
We will be using this to measure our conversions because we know that every time a user loads a thank you page, they’ve downloaded a brochure.
So if you currently don’t have a thank you page- I would make a placeholder for this so we can continue our ads account build.
After you’ve installed your tracking code, hit continue.
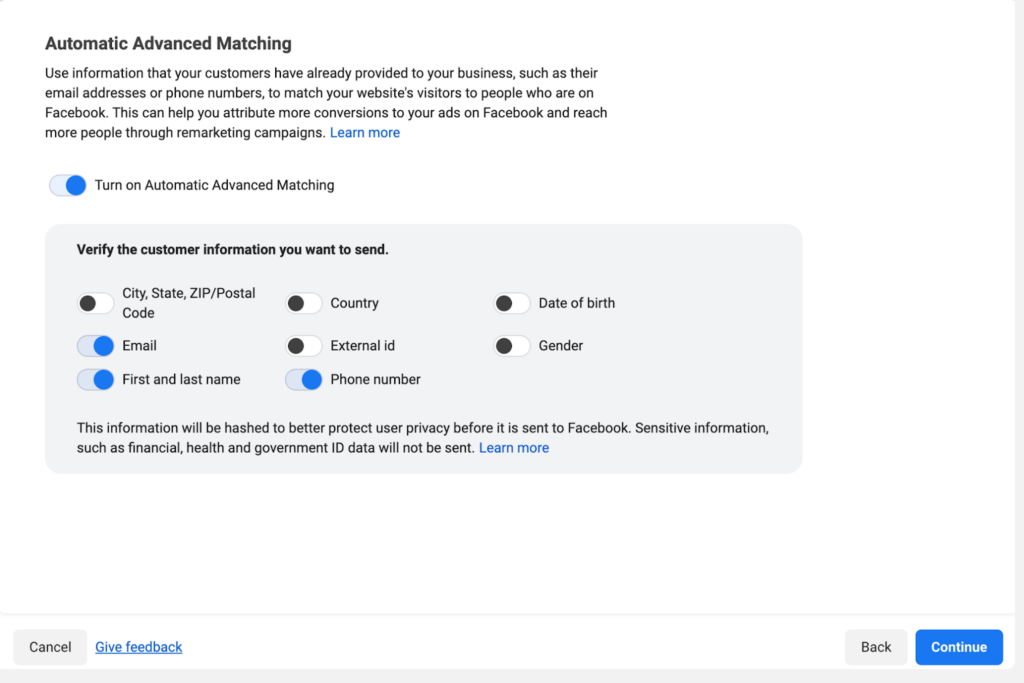
You’ll see a page asking about advanced metrics.
This will be more for remarketing campaigns which we are not covering.
You can turn it off or leave it on (doesn’t matter).
I typically select the options above and hit continue.
Now you will be taken to your event setup page.
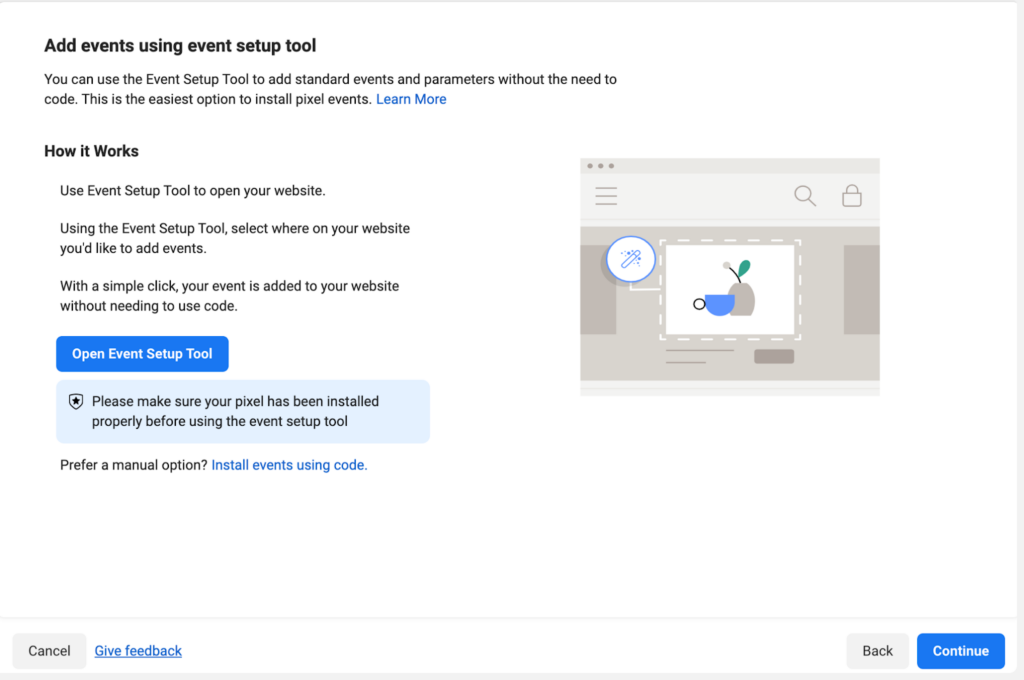
If you want to use the setup tool there is a video here that shows you how to use it:
How to Set Up Facebook Pixel Events with Facebook Event Setup Tool for Web in 2023
I typically use the manual option and click “install events using code”
Now I COULD give you the whole step-by-step of finding a lead event code amongst a mountain of developer documentation that Meta supplies and blah blah (I’m boring myself).
So I’ll save you the time and give you the easy version.
Step 1: find where you put your FB Pixel on JUST your thank you page
Step 2: Pull up that pixel code
Step 3: Find the line of code (around line 13) that says fbq(‘track’, ‘PageView’);
Step 4: Add a new line below that and paste in fbq(‘track’, ‘Lead’);
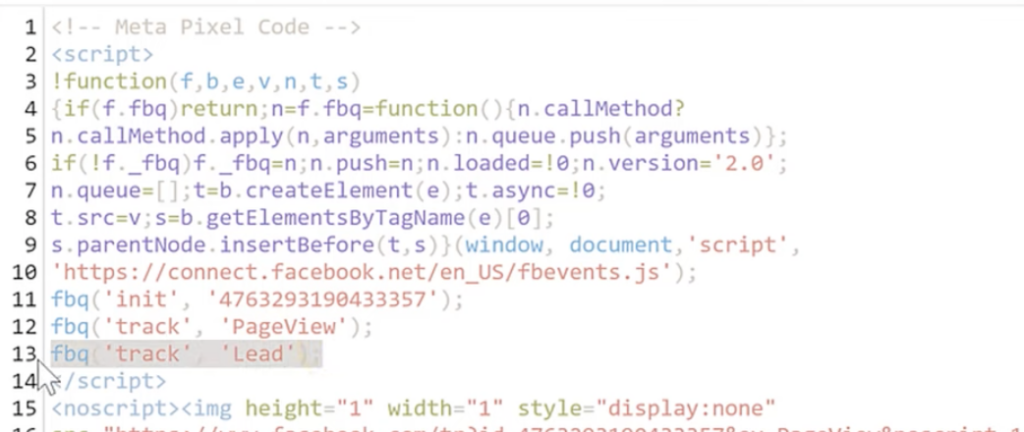
Now we are so close to finishing coding I can see the light at the end of my nerd tunnel.
So stay with me! The fun part of creating the ads is next.
The last thing we need to do is verify your domain.
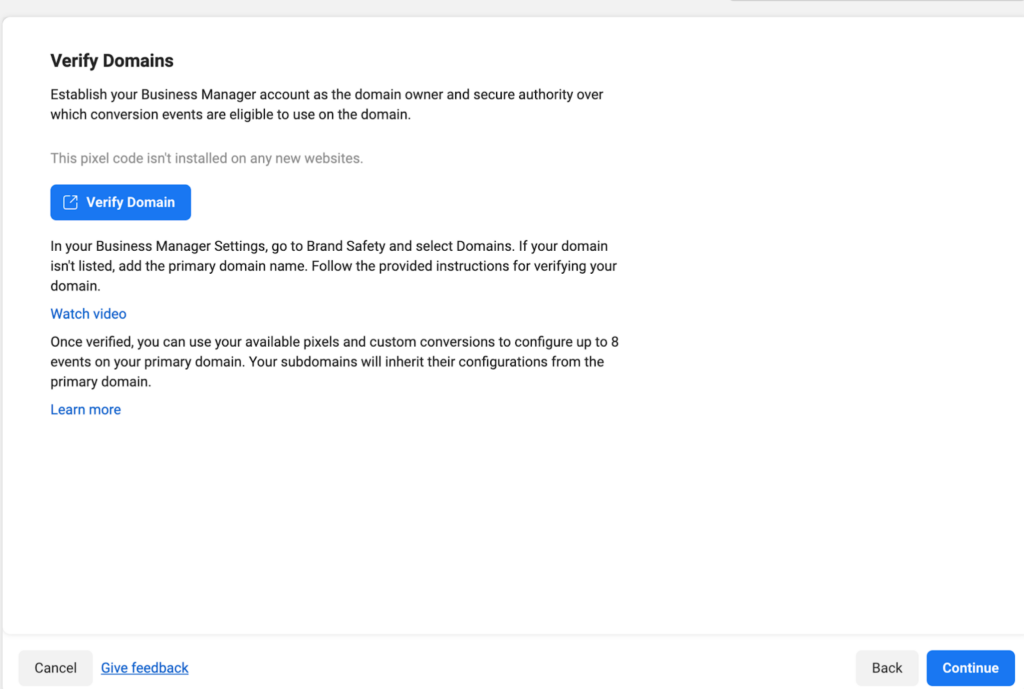
Back on our events manager page click continue from the event setup.
This will take you to the page above. Click on verify domain.
Then click add and create new domain.
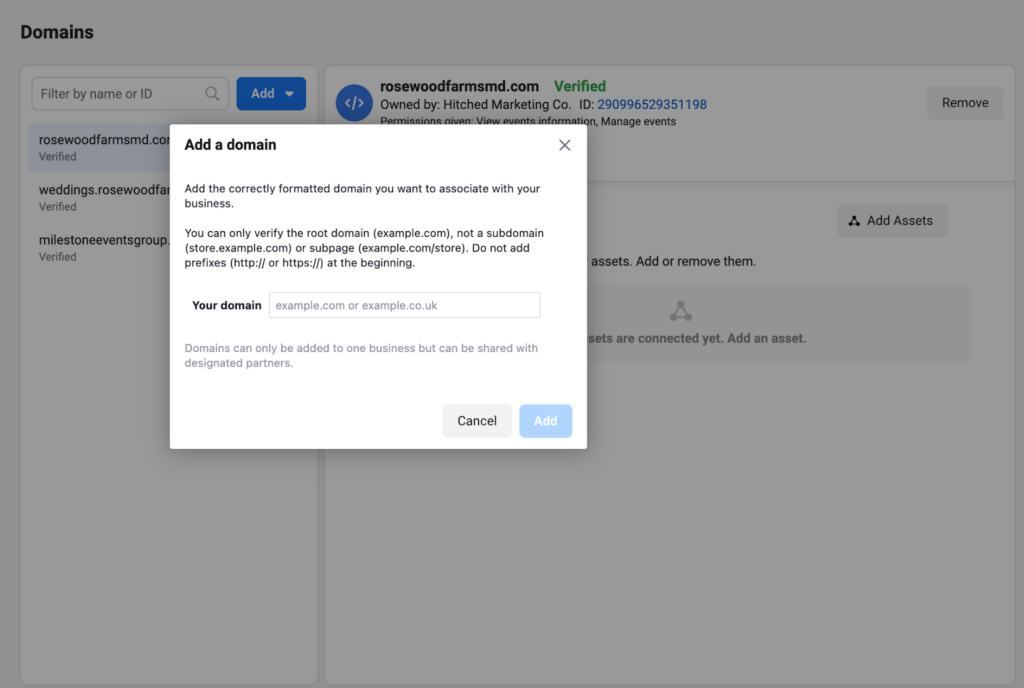
Insert your domain name and click Add.
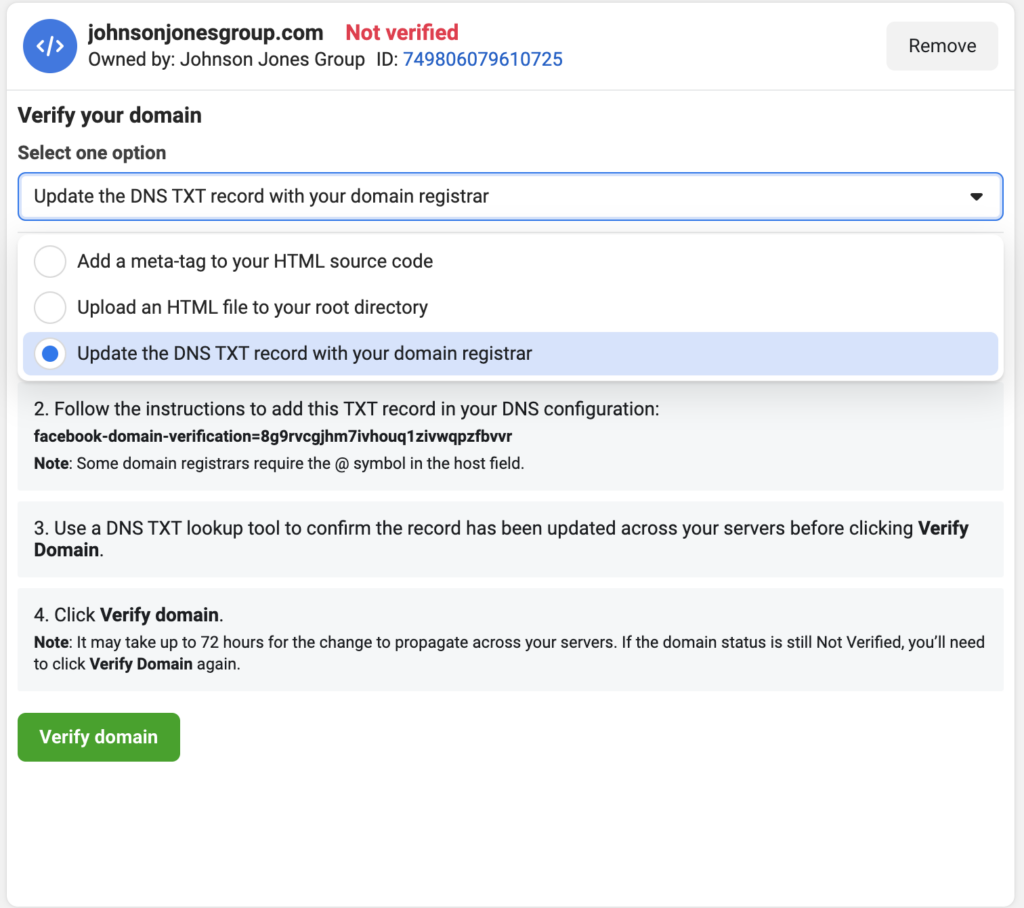
This is the easiest way to do this in my opinion.
- Select Update DNS TXT record.
- Login to your domain registrar (most people use GoDaddy)
- Add the TXT Record code above into your DNS
- Click Verify
If you have GoDaddy- here is a helpful article on how to add a TXT record to your domain here.
If you use somebody else I recommend doing a Google Search:
“How To Add TXT Record To [INSERT DOMAIN REGISTRAR YOU USED]”
It seems intimidating but is actually really easy.
Chapter 10: Setting Up A Custom Conversion
We are finally at the last step to setting you Facebook Ads Campaign Live.
First, find All Tools and click on Event Manager (upper right corner icon)
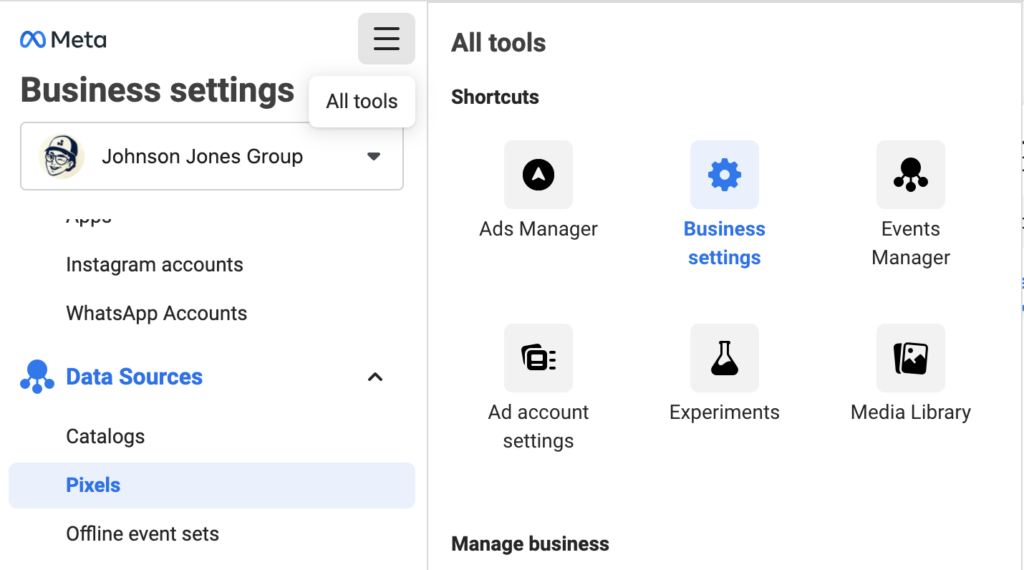
Next, click on “Custom Conversions”
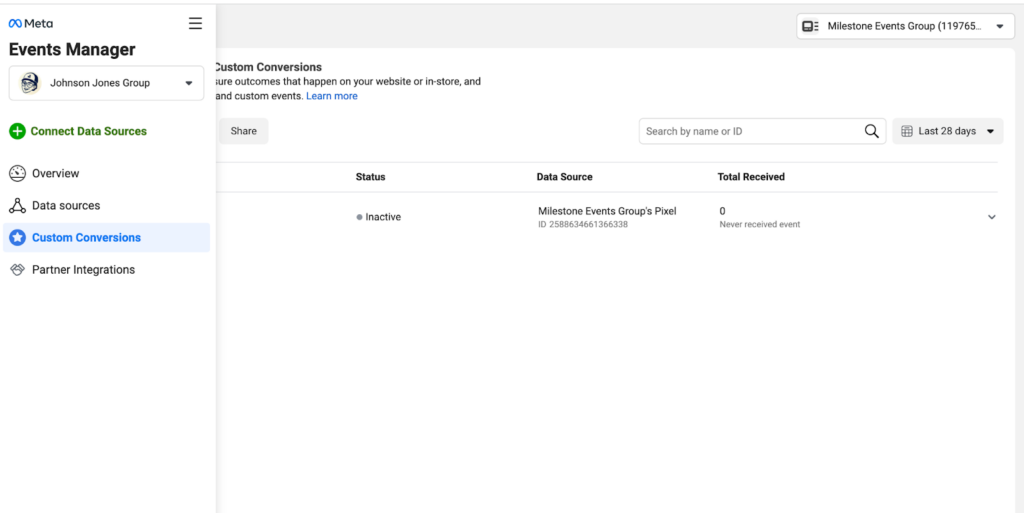
Click on “Create Custom Conversion”
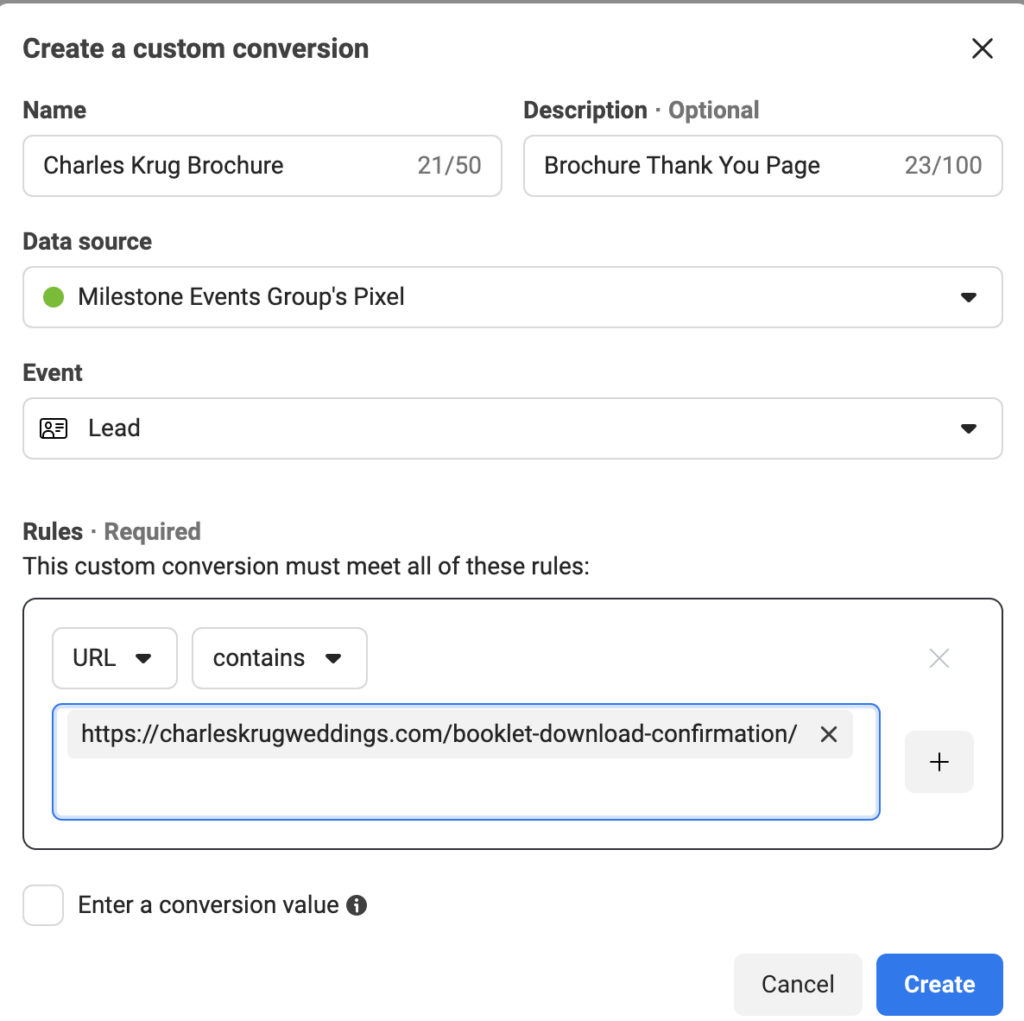
Then name your conversion (I use brochure as a name). Give it a description.
Select your pixel we put in for your data source.
Select Lead as your event.
Finally, enter the URL of your Thank You Page that you’ve created and hit “create”
Chapter 11: Wrapping It All Up
Now we are ready to finish up your ads account (finally).
Go back to your ad campaign draft we were working on earlier.
Then click on your Ad Set level folder.
In my photo, it says “New Conversion Ad Set” at the top (icon with 4 squares in the middle)
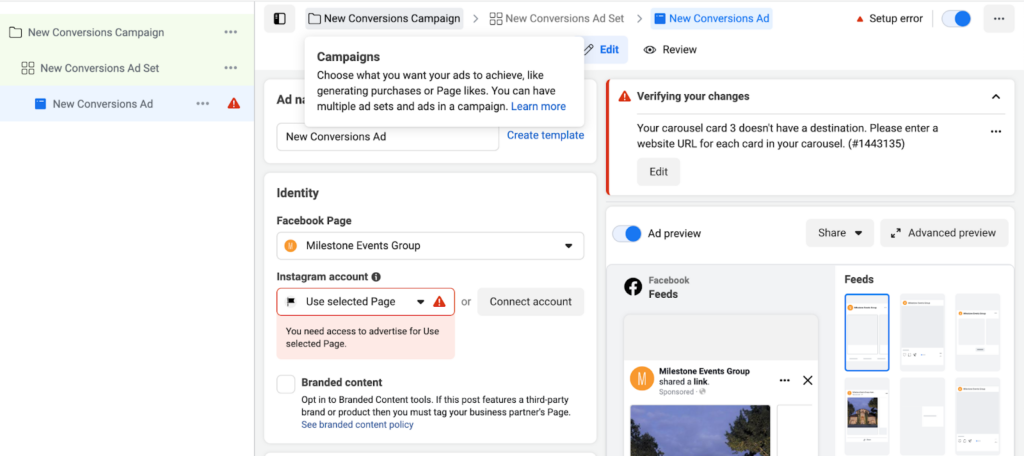
Once you are there, the page should look like this:
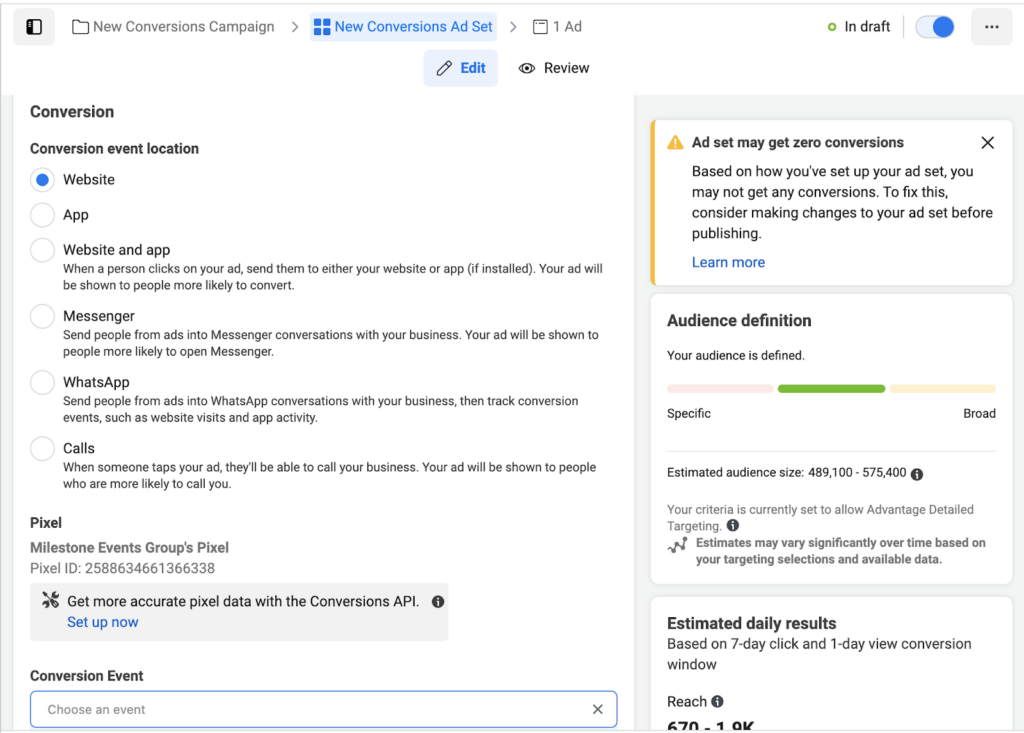
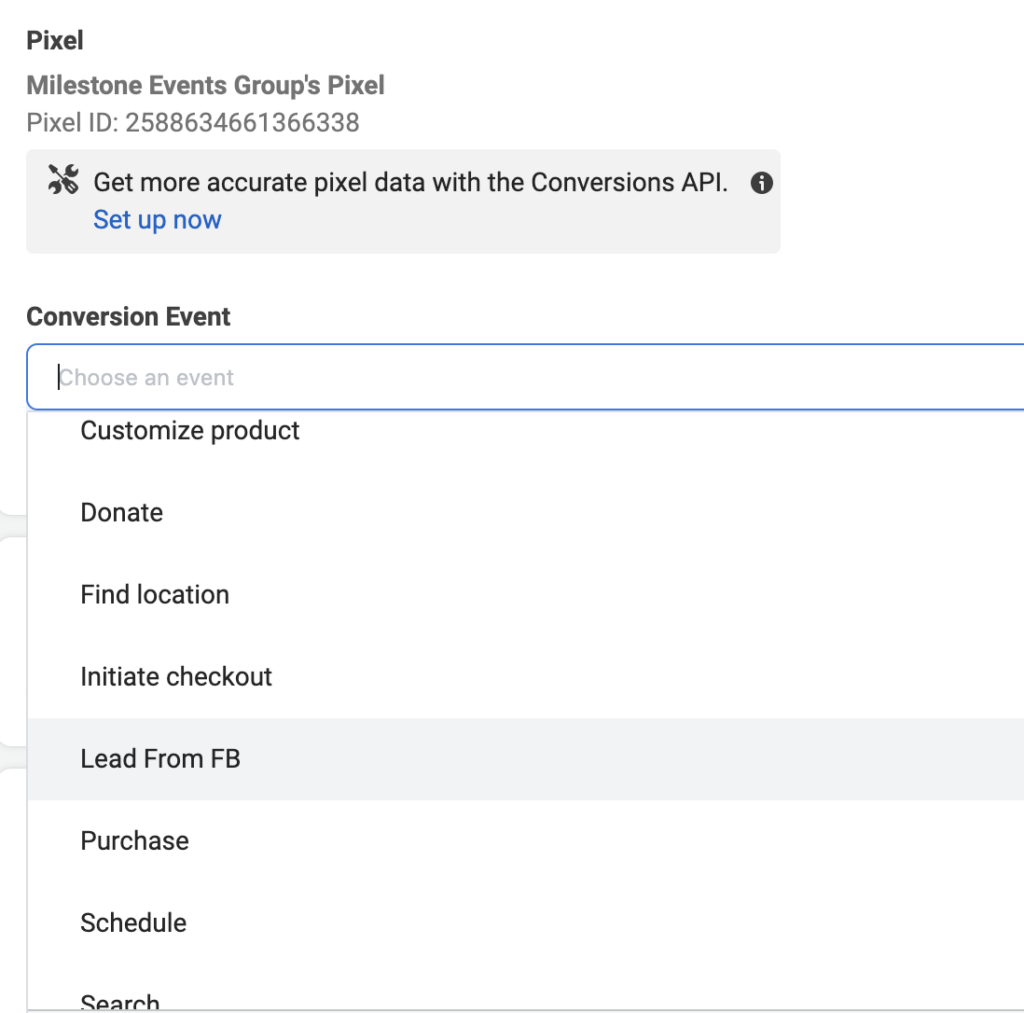
Now scroll down and make sure your pixel is selected for tracking.
Then open your “Conversion Event” drop down menu and locate your custom conversion:
After that, simply go through each level of your account and make sure everything looks good.
Then you can publish and set it live and start letting the leads roll in!
Chapter 12: Final Word
Setting up and running a social media ads campaign is no small task.
I can also understand if the complexity of it all is not worth your time.
Venue owners like yourself already wear too many hats.
If you find yourself wanting someone else to do the work and you can still reap the rewards I really encourage you to check out our website and consider booking a meeting with us.
We would love to put together a plan for your business and see where your marketing could use a boost.
Happy marketing, and I hope to see you around.


